How does bioGUI work?
bioGUI relies on the philosophy that the visual appearance as well as the assembly of the command line arguments can be represented as a network. Especially templates are seen as network, both in their visual description but most importantly also in the execution model.
Install modules
bioGUI install modules are designed to make the regular user’s life as easy as possible. Originally created for WSL, so pure Windows users can also easily install their needed software without the need to care about dependencies, the idea of the bioGUI repository evolved. Install modules are more than just templates, because they install the actual software onto the user’s system, while customizing the bioGUI template for this application. All install modules are regular shell scripts, that are called with fixed parameters.
In general, install modules can be divided into two parts:
- installing the software and its dependencies
- submitting the bioGUI template
For the first part, first the command line arguments are collected and saved. The order of the command line arguments is specified as
- installation directory (PROGDIR)
- sudo password (if not supplied, installing dependencies is allowed to fail)
- [0, 1] for adding software binary to $PATH.
- IP to send template to
- PORT to send template to
A typical template is then structured as follows:
#! Install hisat2-2.0.5
The text after the shebang is shown as title in the Install template Module.
if [ ! "$2" = "" ]; then

    if [ "$(uname)" == "Darwin" ]; then

        echo "Installing brew gcc"
        brew install gcc

    else

        echo "No dependencies"
        echo $2 | sudo -S apt-get update
        echo $2 | sudo -S apt-get install build-essential
    fi

else
    echo "No sudo password, not installing dependencies"
fi
If a sudo password is supplied, dependencies are installed. This must be compatible with Ubuntu’s aptitude, as this is what WSL runs on. Using the uname switch, bioGUI also supports Mac OS and brew, for instance.
Since a lot of harm can be done using the super-user account, install modules are manually curated after submission.
## set all variables
PROG=hisat2-2.0.5

PROGDIR=$1
if [ -z "${PROGDIR}" ]; then
    PROGDIR=~/bioGUI/progs/
fi

PROGDIRESC=$(echo $PROGDIR | sed 's/ /\\ /g')

## create progdir
mkdir -p "$PROGDIR"
Next some variables need to be set up. It showed of great benefit to create a $PROG variable containing the application and version. The $PROGDIR variable contains the installation path, which is also checked to exist. For several reasons it is also a good idea to have an escaped version of the install path by hand.
#download and unzip
if [ ! -f "$PROGDIR/$PROG.zip" ]; then
    wget ftp://ftp.ccb.jhu.edu/pub/infphilo/hisat2/downloads/hisat2-2.0.5-source.zip -O "$PROGDIR/$PROG.zip"
fi

if [ ! -d "$PROGDIR/$PROG" ]; then
    cd "$PROGDIR"
    unzip $PROG.zip -d "$PROGDIR/"
fi
Before actually installing the program, make sure to download and unzip/untar the application source code. For reasons of parsimony, this is only done when the expected file or folder does not exist.
#install prog
cd "$PROGDIR/$PROG"

make

if [ $# -gt 2 ]; then

    if [ "$3" = "1" ]; then

        if ! grep -q "$PROGDIRESC/$PROG" ~/.bashrc; then
            echo "export PATH=\"$PROGDIRESC/$PROG:\$PATH\" " >> ~/.bashrc;
        fi
    fi

fi
After downloading and unzipping, the application can be built in the target directory. Finally, if wanted, the path to the application’s executable is added to the $PATH variable.
Certain programs may need some fixes to work properly on Mac OS, Linux or WSL. This is the place where such fixes could go.
Finally we can send the template to bioGUI, if an IP address and port have been specified:
if [ $# -eq 5 ]; then

IP=$4
PORT=$5

NCCMD=""

if [ "$(uname)" == "Darwin" ]; then
    NCCMD="nc -c $IP $PORT"
else
    NCCMD="nc -q 0 $IP $PORT"
fi


$NCCMD <<EOF

<template description="hisat2 2.0.5 aligner" title="hisat2 2.0.5">
    ...
    <const id="bindir">${PROGDIR}/${PROG}/</const>
    ...
    <execute program="hisat2" param="\${cl}" location="\${bindir}" exec="hisat2" wsl="WSLsel">
        <output type="COUT" color="green" to="outputstream1" />
        <output type="CERR" color="red" to="outputstream2" />
    </execute>

</template>
EOF

fi
Make sure to use nc to send the content back to bioGUI.
Unfortunately the nc-programs differ on Mac OS and Ubuntu, hence the command must be altered according to the underlying OS.
In order to customize the template inbetween the EOF, bash variables to be replaced must be written as ${var-name}.
This conflicts with how bioGUI expects variables. Therefore, make sure to escape the backslaash where you want to access variables in the bioGUI template!
bioGUI Templates
bioGUI templates consist of two parts: the <window>-part which defines the visual appearance and the <execute>-part which defines how the command line arguments of an application are assembled from the graphical input elements.
Visual Model of Templates
Layouts
There exist three different layouts in bioGUI:
- horizontal
- vertical
- grid
Layouts may have either visual components as child, or further layouts. However a visual component may only have one layout child and this must be the first child.
For instance, the cols attribute for the grid layout tells how many columns are needed. If only one attribute is specified, the other attribute is calculated from the number of children and the given attribute.
Layout Components
| node name | allowed attributes |
| <GRID> | [cols, rows] |
| <HGROUP> | [] |
| <VGROUP> | [] |
Visual Elements
In contrast to layout components, visual elements are direct input elements.
Graphical Components
| node name | allowed attributes |
| <ACTION> | [program] |
| <CHECKBOX> | [selected, selectonwindows, value] |
| <COMBOBOX> | [selected] |
| <COMBOITEM> | [value] |
| <FILEDIALOG> | [filter, folder, location, multiples, multiples_delim, output] |
| <FILELIST> | [height, title, width] |
| <FILESELECTBOX> | [delim, filter, location] |
| <GROUP> | [height, title, width] |
| <GROUPBOX> | [multi] |
| <IMAGE> | [height, src, width] |
| <INPUT> | [multi, type {string, int, float, password}] |
| <LABEL> | [link] |
| <RADIOBUTTON> | [value] |
| <SLIDER> | [max, min, step] |
| <SLIDERITEM> | [display, value] |
| <STREAM> | [height, title, width] |
| <STREAMBOX> | |
| <WINDOW> | [height, title, width] |
Execution Model of Templates
Execution Network
Within a bioGUI template, the <execution>...</execution> part defines how the command line argument to be executed is assembled.
The idea is again based on a network of predefined nodes.
The nodes can either be visual components, accessed by their respective id, or Execution Nodes .
Upon starting an application with bioGUI, the execution network is responsible to construct the command line arguments with which the target application is called.
Therefore, all executable nodes in the <execution> part are searched and evaluated one after the other (if there exist several).
Since execution must be started via an action visual element, which can have a program attribute, this allows to specify which executable nodes are executed: if the program attribute is set, this must match with the program attribute of the executable node.
Finally an executable node is executed. Upon this the command line arguments are assembled. This is shown exemplarily in the below figure:
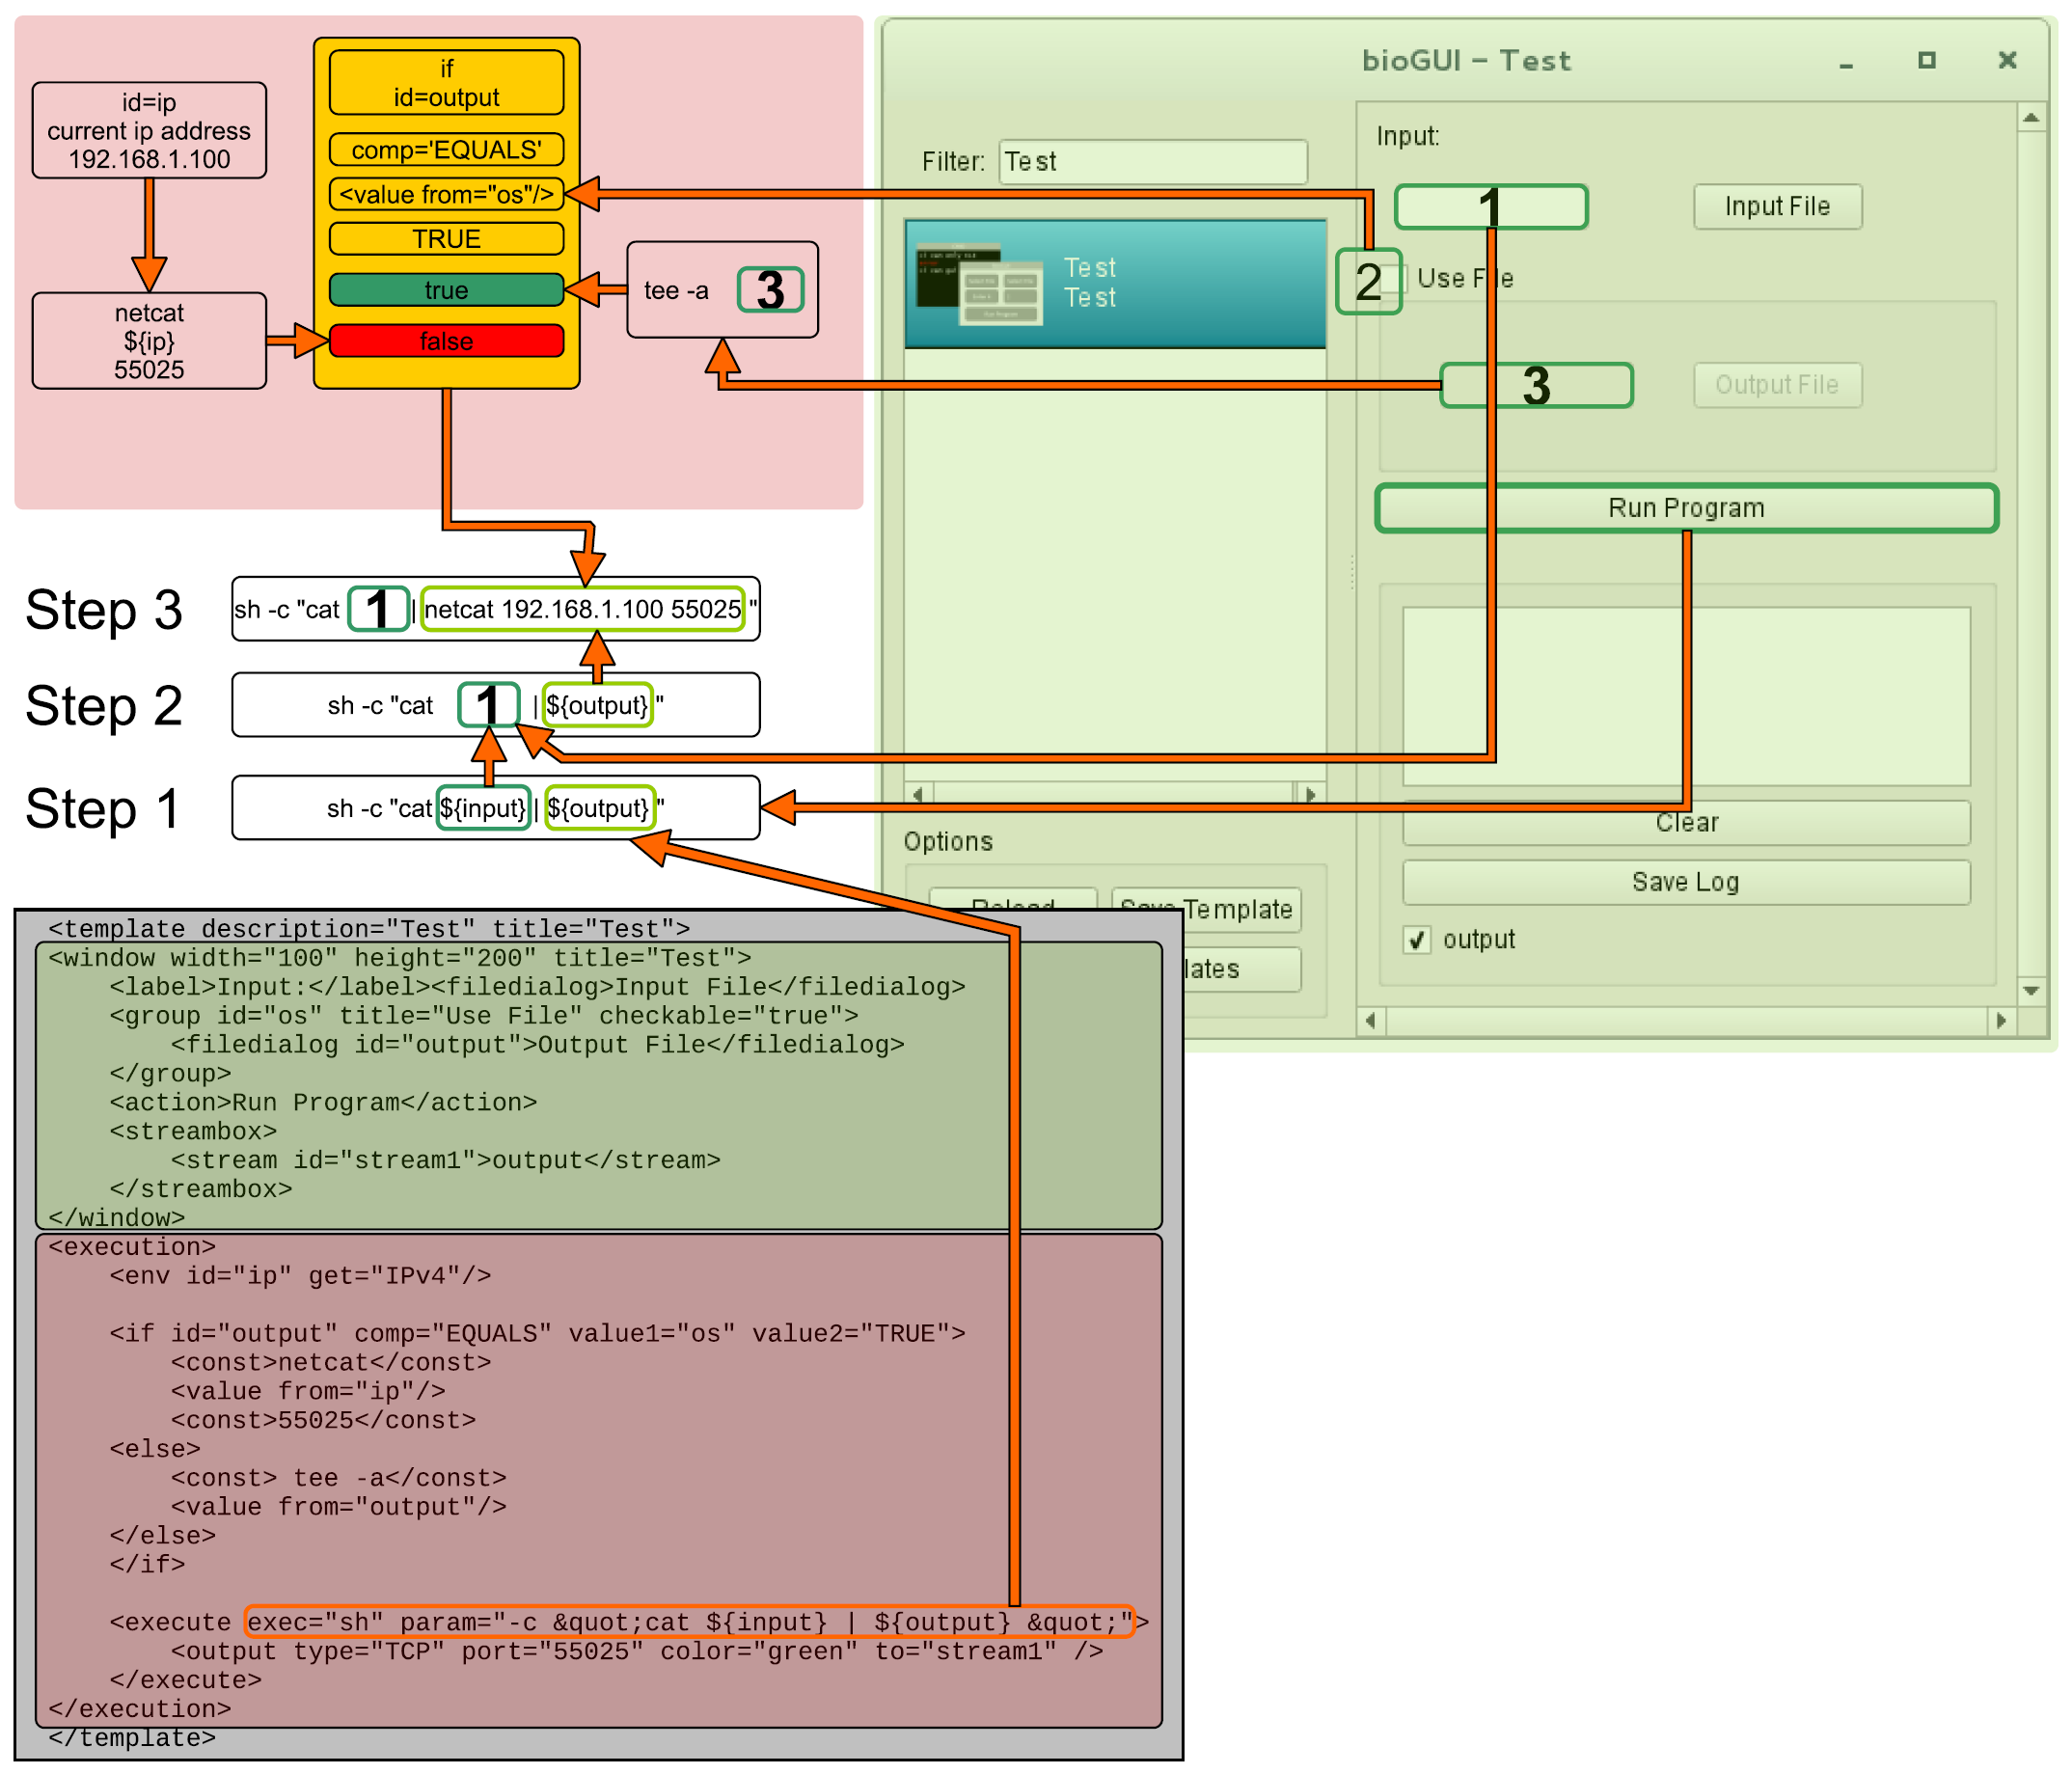
Illustration of an Execution Network for a simple example application.
The command line arguments for the executable sh are collected from the nodes with id s input and output.
While input refers to a visual component node, the output id refers to an if node, which collects data from another visual component node (3) or a node which constructs a netcat command, depending on whether the visual node with id os (2) equals TRUE or not.
List of available execution nodes:
Execution Nodes
| node name | allowed attributes |
| <add> | [ID, TYPE, sep] |
| <const> | [ID, TYPE] |
| <else> | [] |
| <env> | [GET, ID, TYPE] |
| <execute> | [EXEC, ID, PROGRAM, TYPE, location, param, program, wsl] |
| <update> | [deferred, target, attrib, value] |
| <messagebox> | [deferred] |
| <file> | [FROM, ID, SEP, TO, TYPE] |
| <httpexecute> | [CL_TO_POST, DELIM, ID, PORT, PROGRAM, TYPE] |
| <if> | [COMP, ID, SEP, TYPE, VALUE1, VALUE2] |
| <math> | [ID, OP, TYPE] |
| <orderedadd> | [FROM, ID, SELECTED, TYPE] |
| <output> | [COLOR, DEFERRED, FROM, HOST, ID, LOCATION, PORT, TO, TYPE, TYPE] |
| <relocate> | [FROM, ID, PREPEND, TO, TYPE, UNIX, WSL] |
| <replace> | [ID, REPLACE, REPLACE_WITH, TYPE] |
| <script> | [ARGV, ID, SCRIPT, TYPE] |
| <value> | [FOR, FROM, ID, TYPE] |