bioGUI documentation
Bioinformatics is a highly interdisciplinary field providing tools for researchers from many disciplines. Nonetheless, most methods are implemented with a command line Interface only.
Using bioGUI, former command line-only tools can be started from a GUI, making them available to a broader scientific community.
If you are a user, it is recommended to start reading directly from bioGUI: a universal GUI for command line tools. Please also read through the User Guide. We also provide a video tutorial to demonstrate how to install a module with an install module and use this module/tool afterwards in Use an Install Module (video tutorial).
If you are a (bioinformatics) tools developer and want to learn how to build (install) templates, start reading here: How does bioGUI work?.
If the offered windows and execution nodes are not enough and you want to extend bioGUI, the bioGUI Developer Guide may be of help for you.
bioGUI: a universal GUI for command line tools
Bioinformatics is a highly interdisciplinary field providing tools for researchers from many disciplines. Nonetheless, most methods are implemented with a command line Interface only. Non-computer affine colleagues may well interpret results from such tools, but installing and starting tools on the command-Line often is a problem. Providing a Graphical User-Interface (GUI) for bioinformatics tools is a step towards routinely applying these command line-only tools, and, thus a more effective interdisciplinary work.
bioGUI is a universal GUI for command line tools making use of Window’s newest feature: WSL (Windows Subsystem for Linux), which provides a native Ubuntu bash on Windows. bioGUI templates are easily scriptable and render a GUI for user input from defined visual components elements. Install modules can install a tool and its template with few clicks from our emph{bioGUI} repository.
Using bioGUI, former command line-only tools can be started from a GUI, making them available to a broader scientific community.
Who is bioGUI for?
With bioGUI, domain experts, who don’t want to be bothered with the command Line, are enabled to use high standard bioinformatics tools. bioGUI specifically aims at Windows users, as Microsoft just introduced the Windows Subsystem for Linux (WSL) with its Bash on Ubuntu on Windows. This system allows the usage of said sophisticated tools on a regular Windows computer as most people have. With bioGUI one also does not need any knowledge about the command line, because the task of executing a given tools becomes a point & click solution.
What is bioGUI currently not?
It is not about generating a GUI by its own. Currently generating template files is a manual business, which is best performed by a tool’s developer. For the future, integration of automatic command line Interface to bioGUI converters are thought of. However, this could only be realised for a limited number of argument parsers, such as argparse for python.
User Guide
How to get bioGUI?
Download bioGUI releases from the github releases. Please note additional information provided in our User Guide.
Install bioGUI
Binary packages/releases for the following operating system are provided on github.
Windows
Extract the zip-File and place the contained bioGUI folder somewhere on your hard drives.
Follow the instructions to setup WSL: How to setup WSL (Bash on Ubuntu).
Please do not put bioGUI in your Program Files directory, as this is specially protected by Windows and may cause problems.
Place bioGUI into a location which does not contain spaces in its name, e.g not C:\Program Files\bioGUI !
You can put bioGUI for instance into the locations C:\bioGUI\ or D:\bioGUI\ !
If you want to access external drives (USB stick, network drive), you first need to mount this drive into WSL. The WSL Mount Drive install module will install a script which can do this for you. Make sure to save the template and use the Mount Drive (WSL) template to make the drive available to WSL. You need to enter the drive-letter you want to mount (e.g. F), and your sudo password.
Linux
Extract the tar.gz file and place the contained bioGUI folder somewhere on your hard drives.
On Ubuntu you can then execute the bioGUI.desktop file, e.g. from your Explorer equivalent, or being in the bioGUI folder, the command-line: dex bioGUI.desktop (you may need to install dex first: sudo apt-get install dex).
Alternatively you can also simply execute sh ./bioGUI.sh.
Mac OS
Download and open the provided dmg package. You can simply drag and drop the bioGUI.app into your Applications folder.
bioGUI has been built for Mac OS X 10.14 Mojave. Mac OS may bother your about running an app from a non-signed/verified developer.
In the Preferences->Security menu you can tell Mac OS to still run bioGUI.
In order to use bioGUI, it may be required to install the OSX command line tools as well as brew.
For the command line tools, open a Terminal and enter xcode-select --install.
You can get brew from here
To test brew, simply run the following code:
brew install wget netcat
Make sure to have brew in your path.
From the terminal, run:
echo "export PATH=/usr/local/bin/:\$PATH" >> ~/.bash_profile
This will tell Mac OS to look for (unix) applications also under /usr/local/bin/. This is where brew installs itself.
Installing new software with Install Modules
After downloading an Install Module, the Install Template Module will list the downloaded install template (you might need to reload once).
The screenshot below shows the Install Template Module.
In the dropdown menu, the hisat2 install template has been chosen.
Since this module is executed on Windows, WSL is selected.
hisat2 is supposed to be installed into the User Data Dir, which is on WSL and linux usually ~/.local/share/bioGUI.
This is the directory where bioGUI installs new programs.
Advanced users may want to change this settings, but in general, it should be left.
In order to automatically install dependencies, the sudo-password must be supplied. This is the password you set up during the installation of the WSL feature. This gives bioGUI administrative rights within WSL such that it can install dependencies automatically.
Finally the path for the specific GUI template has to be set. bioGUI by default only searches the template directory besides the executable.
GUI templates must have the file extension .gui. If your entered template name does not end with this extension, the extension is appended to your filename.
As a short-cut, if you just enter a name (e.g. mygui), bioGUI will save the new template in the template directoy with the filename mygui.gui.

Use-case: Windows setup
The binary distribution (zip-files) are targeted for end-users: [prebuilt binaries](https://github.com/mjoppich/bioGUI/releases). Download the Windows version.
Make sure that the Windows Subsystem for Linux (WSL) is installed. Please follow the steps on [how to setup WSL](http://biogui.readthedocs.io/en/latest/build_wsl.html).
After downloading the zip-archive, please unzip the archive to a location of your preference. Then simply start the executable (bioGUI.exe on Windows). Place bioGUI into a location which does not contain spaces in its name, e.g not C:Program FilesbioGUI ! C:bioGUI is fine though!
On any aptitude supported platform (e.g. Windows with WSL, Ubuntu), please download the “First Time Ubuntu/WSL/apt-get Setup” from the list of available templates and install it via Install Template Module (install program: First Time Ubuntu/WSL/apt-get setup).
Below this process is shown by an animation.
Setup First Time Use
For the First Time Use setups, please make sure to insert your sudo/user password and deselect to save a template.

Please make sure that bioGUI closes the setup with the following message:

If you do not see this message, (raise an issue on GitHub) with attaching the log.txt file in the bioGUI folder, or /tmp/log_biogui.txt on Mac OS, as well as an screenshot of the attempt.
Install an install module

After the install module has been installed, you will see a message stating that bioGUI installed the software:

If you do not see the message, but only blue text, like below, you need to scroll up:

If you do not see this message, (raise an issue on GitHub) with attaching the log.txt file in the bioGUI folder, or /tmp/log_biogui.txt on Mac OS, as well as an screenshot of the attempt.
Use an Install Module
After installing a software, e.g. graphmap, you can reload the list of available templates by pressing the reload button.
Download the install module for graphmap as shown in the previous section. Next select the graphmap install module in the Install Templates template and fill out your Linux User Password/sudo Password. If you are on Windows, make sure that the Use WSL? checkbox is selected.

Enter the name of the template you would like to use in the input field within the Store Template group box (which you should have selected). In order for bioGUI to find a template it must reside in the template folder next to the bioGUI executable. Finally press Install Program and wait until the installation finishes. Besides the template being sent to bioGUI (in blue text), you should see the green message that your program has been installed correctly:

You can now Reload the templates again and will see a graphmap template on the left:

In this template you have to possibility to select the alignment mode (align or overlap/owler), specify the reference sequence, reads, gene annotation file (for splice-aware alignment) as well as the output file. To select files via a file dialog, click the corresponding button on the right. Using the Additional Options field, you can also enter command-line parameters directly. This may be necessary because the template is not complete, or new options have been added (or because you know shortcuts).
Exemplarily we filled our some parameters:

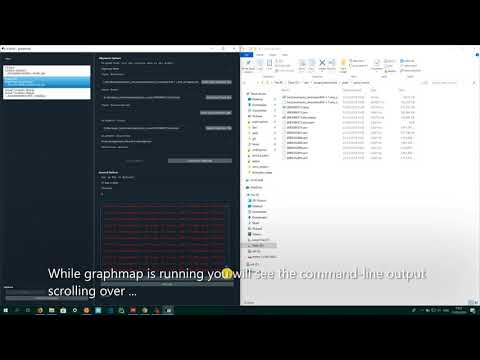
Clicking on Run Graphmap will now execute graphmap via bioGUI. In this case, the called command-line tool is graphmap -r <reference> -d <reads> -o <output>.
Upon completion, the bioGUI options button (lower left) will become enabled again, as well as the Run Graphmap button. If you need to cancel the current process, click the Cancel Run Graphmap button. You will see all the intermediate output from graphmap and have the option to save the command-line output using the Save log button. If you want to save the inputs you made, using the Save template button of the bioGUI options, you can save the inputs you made. Save the template in the template directory in the same folder as bioGUI to see the template.

Use an Install Module (video tutorial)
If you prefer to understand these steps as part of a video, please have a look attaching
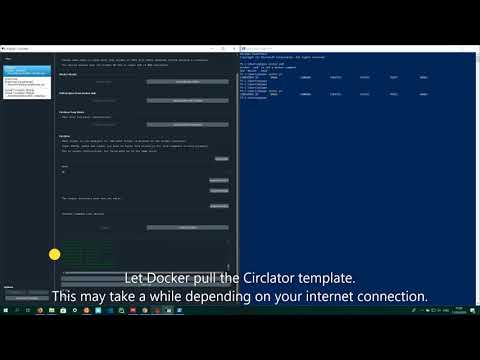
Installing graphmap (from install module) and using it:
Using the circlator docker template:
Adding Own Templates
Part of bioGUI is a simple accessibility of templates for various programs. Therefore, application developers and sophisticated users can upload their templates to our website in order to make their template available to other users. The user has to submit his name, eMail address, a template name and the template itself. He can select whether he wants to be an anonymous user (user name is always hidden) and whether this is an installation script (which downloads and creates the ac{GUI} template specifically for this installed application) or a regular template. Additionally, categories for the template can be supplied, e.g. whether this is a template for a sequencing tool, or proteomics. A screenshot of the template submission is shown below.

Additionally the (bioGUI website) also contains a searchable list of already available templates. Available templates are only shown and can be downloaded via the bioGUI application.

Within bioGUI, clicking the Download Templates button, a new dialog window opens showing a list of available templates. Columns can be sorted by double clicking the header, and using the search only templates which contain the searched words are shown. Upon selecting one or multiple (keep ctrl-key down while clicking) rows and clicking the Download button, those templates are downloaded and available for the user. Since it is possible to copy or alter templates, bioGUI never overwrites existing templates, but will create a new copy.

How to setup WSL (Bash on Ubuntu)
Depending on your Windows version you need to activate Developer Mode first. How this is done is explained at the end of this page.
For all recent versions of Windows 10 you can start with step 1.
Warning
Some antivirus software (e.g. Kaspersky) disable internet access for unknown/new programs. Make sure bioGUI can access the internet!
Step 1: Activate WSL feature
First WSL has to be enabled from Windows features. Therefore, simply search for the Turn Windows features on or off option in the control panel.

Once found, look for the Windows Subsystem for Linux (Beta) row and make sure to check the corresponding box.

This will download and install the desired WSL feature. Finally apply the change and make sure to reboot your computer

Step 2: Install Linux
After having enabled the WSL feature, we can visit the Microsoft Windows Store to download Linux.
In order to do so, we open the Windows Store app, and search for Linux. We select the Run Linux on Windows menu entry.

There are many different flavors (comparable to strains in biology) of linux and some are already offered on the Windows store. Best compatibility for bioGUI has Ubuntu.
Important: You should consider using the latest Ubuntu version available. This is Ubuntu 18.04 at the time of writing. You specifically have to search for Ubuntu 18.04 in the store !

Now let the Windows store install your Linux app and once that is done, open your newly installed Linux:

The black screen will guide you through the install process. It will first unpack itself and then ask you to create a linux user account.
It is recommended to choose a username and password you can easily remember. Remembering the password is essential here, as it will be needed for any installation to be performed on WSL and by bioGUI.

Step 3: Prepare WSL
Before you can use bioGUI on WSL/Ubuntu please make sure to run the First time Ubuntu/WSL/apt-get Setup from bioGUI. For the sudo/user password please enter the password for your linux user account from the step above.

In case there are problems please contact the author of the software.
If you are running an old Windows 10 version, you first need to activate developer mode before you are able to enable the Windows Subsystem for Linux feature.
Step 0: Activate Developer Mode
Since WSL/Bash on Ubuntu on Windows is a developer feature, first the developer mode has to be actived. Therefore we go into the Settings app and select Update & Security.

We further navigate into the For developers tab on the left.

In the For developers options we switch from Windows Store apps to Developer mode.

How does bioGUI work?
bioGUI relies on the philosophy that the visual appearance as well as the assembly of the command line arguments can be represented as a network. Especially templates are seen as network, both in their visual description but most importantly also in the execution model.
Install modules
bioGUI install modules are designed to make the regular user’s life as easy as possible. Originally created for WSL, so pure Windows users can also easily install their needed software without the need to care about dependencies, the idea of the bioGUI repository evolved. Install modules are more than just templates, because they install the actual software onto the user’s system, while customizing the bioGUI template for this application. All install modules are regular shell scripts, that are called with fixed parameters.
In general, install modules can be divided into two parts:
- installing the software and its dependencies
- submitting the bioGUI template
For the first part, first the command line arguments are collected and saved. The order of the command line arguments is specified as
- installation directory (PROGDIR)
- sudo password (if not supplied, installing dependencies is allowed to fail)
- [0, 1] for adding software binary to $PATH.
- IP to send template to
- PORT to send template to
A typical template is then structured as follows:
#! Install hisat2-2.0.5
The text after the shebang is shown as title in the Install template Module.
if [ ! "$2" = "" ]; then
if [ "$(uname)" == "Darwin" ]; then
echo "Installing brew gcc"
brew install gcc
else
echo "No dependencies"
echo $2 | sudo -S apt-get update
echo $2 | sudo -S apt-get install build-essential
fi
else
echo "No sudo password, not installing dependencies"
fi
If a sudo password is supplied, dependencies are installed. This must be compatible with Ubuntu’s aptitude, as this is what WSL runs on. Using the uname switch, bioGUI also supports Mac OS and brew, for instance.
Since a lot of harm can be done using the super-user account, install modules are manually curated after submission.
## set all variables
PROG=hisat2-2.0.5
PROGDIR=$1
if [ -z "${PROGDIR}" ]; then
PROGDIR=~/bioGUI/progs/
fi
PROGDIRESC=$(echo $PROGDIR | sed 's/ /\\ /g')
## create progdir
mkdir -p "$PROGDIR"
Next some variables need to be set up. It showed of great benefit to create a $PROG variable containing the application and version. The $PROGDIR variable contains the installation path, which is also checked to exist. For several reasons it is also a good idea to have an escaped version of the install path by hand.
#download and unzip
if [ ! -f "$PROGDIR/$PROG.zip" ]; then
wget ftp://ftp.ccb.jhu.edu/pub/infphilo/hisat2/downloads/hisat2-2.0.5-source.zip -O "$PROGDIR/$PROG.zip"
fi
if [ ! -d "$PROGDIR/$PROG" ]; then
cd "$PROGDIR"
unzip $PROG.zip -d "$PROGDIR/"
fi
Before actually installing the program, make sure to download and unzip/untar the application source code. For reasons of parsimony, this is only done when the expected file or folder does not exist.
#install prog
cd "$PROGDIR/$PROG"
make
if [ $# -gt 2 ]; then
if [ "$3" = "1" ]; then
if ! grep -q "$PROGDIRESC/$PROG" ~/.bashrc; then
echo "export PATH=\"$PROGDIRESC/$PROG:\$PATH\" " >> ~/.bashrc;
fi
fi
fi
After downloading and unzipping, the application can be built in the target directory. Finally, if wanted, the path to the application’s executable is added to the $PATH variable.
Certain programs may need some fixes to work properly on Mac OS, Linux or WSL. This is the place where such fixes could go.
Finally we can send the template to bioGUI, if an IP address and port have been specified:
if [ $# -eq 5 ]; then
IP=$4
PORT=$5
NCCMD=""
if [ "$(uname)" == "Darwin" ]; then
NCCMD="nc -c $IP $PORT"
else
NCCMD="nc -q 0 $IP $PORT"
fi
$NCCMD <<EOF
<template description="hisat2 2.0.5 aligner" title="hisat2 2.0.5">
...
<const id="bindir">${PROGDIR}/${PROG}/</const>
...
<execute program="hisat2" param="\${cl}" location="\${bindir}" exec="hisat2" wsl="WSLsel">
<output type="COUT" color="green" to="outputstream1" />
<output type="CERR" color="red" to="outputstream2" />
</execute>
</template>
EOF
fi
Make sure to use nc to send the content back to bioGUI.
Unfortunately the nc-programs differ on Mac OS and Ubuntu, hence the command must be altered according to the underlying OS.
In order to customize the template inbetween the EOF, bash variables to be replaced must be written as ${var-name}.
This conflicts with how bioGUI expects variables. Therefore, make sure to escape the backslaash where you want to access variables in the bioGUI template!
bioGUI Templates
bioGUI templates consist of two parts: the <window>-part which defines the visual appearance and the <execute>-part which defines how the command line arguments of an application are assembled from the graphical input elements.
Visual Model of Templates
Layouts
There exist three different layouts in bioGUI:
- horizontal
- vertical
- grid
Layouts may have either visual components as child, or further layouts. However a visual component may only have one layout child and this must be the first child.
For instance, the cols attribute for the grid layout tells how many columns are needed. If only one attribute is specified, the other attribute is calculated from the number of children and the given attribute.
Layout Components
| node name | allowed attributes |
| <GRID> | [cols, rows] |
| <HGROUP> | [] |
| <VGROUP> | [] |
Visual Elements
In contrast to layout components, visual elements are direct input elements.
Graphical Components
| node name | allowed attributes |
| <ACTION> | [program] |
| <CHECKBOX> | [selected, selectonwindows, value] |
| <COMBOBOX> | [selected] |
| <COMBOITEM> | [value] |
| <FILEDIALOG> | [filter, folder, location, multiples, multiples_delim, output] |
| <FILELIST> | [height, title, width] |
| <FILESELECTBOX> | [delim, filter, location] |
| <GROUP> | [height, title, width] |
| <GROUPBOX> | [multi] |
| <IMAGE> | [height, src, width] |
| <INPUT> | [multi, type {string, int, float, password}] |
| <LABEL> | [link] |
| <RADIOBUTTON> | [value] |
| <SLIDER> | [max, min, step] |
| <SLIDERITEM> | [display, value] |
| <STREAM> | [height, title, width] |
| <STREAMBOX> | |
| <WINDOW> | [height, title, width] |
Execution Model of Templates
Execution Network
Within a bioGUI template, the <execution>...</execution> part defines how the command line argument to be executed is assembled.
The idea is again based on a network of predefined nodes.
The nodes can either be visual components, accessed by their respective id, or Execution Nodes .
Upon starting an application with bioGUI, the execution network is responsible to construct the command line arguments with which the target application is called.
Therefore, all executable nodes in the <execution> part are searched and evaluated one after the other (if there exist several).
Since execution must be started via an action visual element, which can have a program attribute, this allows to specify which executable nodes are executed: if the program attribute is set, this must match with the program attribute of the executable node.
Finally an executable node is executed. Upon this the command line arguments are assembled. This is shown exemplarily in the below figure:

Illustration of an Execution Network for a simple example application.
The command line arguments for the executable sh are collected from the nodes with id s input and output.
While input refers to a visual component node, the output id refers to an if node, which collects data from another visual component node (3) or a node which constructs a netcat command, depending on whether the visual node with id os (2) equals TRUE or not.
List of available execution nodes:
Execution Nodes
| node name | allowed attributes |
| <add> | [ID, TYPE, sep] |
| <const> | [ID, TYPE] |
| <else> | [] |
| <env> | [GET, ID, TYPE] |
| <execute> | [EXEC, ID, PROGRAM, TYPE, location, param, program, wsl] |
| <update> | [deferred, target, attrib, value] |
| <messagebox> | [deferred] |
| <file> | [FROM, ID, SEP, TO, TYPE] |
| <httpexecute> | [CL_TO_POST, DELIM, ID, PORT, PROGRAM, TYPE] |
| <if> | [COMP, ID, SEP, TYPE, VALUE1, VALUE2] |
| <math> | [ID, OP, TYPE] |
| <orderedadd> | [FROM, ID, SELECTED, TYPE] |
| <output> | [COLOR, DEFERRED, FROM, HOST, ID, LOCATION, PORT, TO, TYPE, TYPE] |
| <relocate> | [FROM, ID, PREPEND, TO, TYPE, UNIX, WSL] |
| <replace> | [ID, REPLACE, REPLACE_WITH, TYPE] |
| <script> | [ARGV, ID, SCRIPT, TYPE] |
| <value> | [FOR, FROM, ID, TYPE] |
Developer Guide
It is highly recommend to read the mechanism section How does bioGUI work? first. For more information about visual/execution node behaviour, check section bioGUI Nodes Description.
Extending bioGUI
The creation of nodes for both the visual model as well as the execution model is organised by factories.
Window component factory
In order to add new visual components, one must register the constructor for a new visual elements in the WindowComponentFactory.
Each constructor for new components must extend the WindowWidgetNode class to return CreatedElement objects.
This class contains the retriever function for the created element (which fetches values from nodes in bioGUI) as well as a WidgetFunctionNode.
The WidgetFunctionNode contains a pointer to the widget, as well as attribute setters.
These attribute setters can update specific attributes/properties of the widget, for instance the image to be displayed (<UPDATE> node).
Execution node factory
The execution model has no special node factory, but the XMLParserExecution serves as such (this may change soon).
Here, nodes must be registered.
Execution nodes must extend the ExecutionNode class.
The most important function to implement is the std::string evaluate(...) function.
This function has three parameters, namely std::map< std::string, ExecutionNode*>* pID2Node, std::map<std::string, std::string>* pInputID2Value and std::map<std::string, WidgetFunctionNode*>* pInputID2FunctionWidget.
pID2Node is a map which contains a pointer to the ExecutionNode for a given id.
pInputID2Value is a map which maps any visual element (by id) to its value (determined by the retriever function).
Finally pInputID2FunctionWidget is a map from any visual element (by id) to its WidgetFunctionNode. This map is essential for updating visual elements (e.g. changing the image being displayed).
bioGUI Nodes Description
Visual Model Nodes
<GROUP> node
<group ordered="true" id="orderedgroup" title="Step options">
<grid rows="1" cols="2">
<group id="slidingwindow_opt" selected="false" title="Sliding Window" checkable="true">
<label>Size</label>
<input id="slidingwindow_size" type="int"/>
<label>Quality</label>
<input id="slidingwindow_quality" type="int"/>
</group>
<group id="leadingwindow_opt" selected="false" title="Leading Window" checkable="true">
<hgroup>
<label>Quality</label>
<input id="leadingwindow_quality" type="int"/>
</hgroup>
</group>
</grid>
</group>
<orderedadd id="steps" from="orderedgroup" selected="true">
<value from="slidingwindow" for="slidingwindow_opt"/>
<value from="leading" for="leadingwindow_opt"/>
</orderedadd>
Each group node can have its own layout, which must be the first and only child of a group node.
An ordered group node will give its children (visual model nodes) an order, so the user can select in which order something is taken.
For this to function, the values must be retrieved using the orderedadd node in the exeuction model.
The for attribute must be the id of an element within the ordered group. And the from attribute must be the attribute of an exeuction node which contains the value to be written at this position.
A group may also be checkable, which means that it has a checkbox. It will return “true” if checked, “false” otherwise.
Setting checked_value or unchecked_value, respectively, allows custom values.
Setting selected="true" will make it checked right from the beginning.
If exclusive="true" is set as attribute, only one child may be selected at a time.
<COMBOBOX> node
A combobox is checkable, which means that it has a checkbox. It will return “true” if checked, “false” otherwise.
Setting checked_value or unchecked_value, respectively, allows custom values.
Setting selected="true" will make it checked right from the beginning.
<STREAMBOX>/<STREAM> node
The STREAMBOX is the default output box, where standard out could be written to.
In order to function, a streambox must have at least one STREAM child with an ID.
This stream is then connected with one or multiple <EXECUTE>/<ACTION> node .
<streambox id="output1">
<stream id="outputstream1">std out</stream>
<stream id="outputstream2">err out</stream>
</streambox>
Layout Nodes
<HGROUP>/<VGROUP> node
<vgroup>
<label>First:</label>
<label>Second: under first</label>
</vgroup>
<GRID> node
The GRID node layouts its children visual model nodes in a grid. If only rows or columns are specified, the other value is calculated from the number of children.
<grid rows="2" cols="2">
<label>Top Left</label>
<label>Top Right</label>
<label>Bottom Left</label>
<label>Bottom Right</label>
</grid>
Execution Model Nodes
<RELOCATE> node
The relocate node probably is the most useful node of all, at least for templates aiming at Windows Subsystem for Linux/Bash on Ubuntu on Windows enabled templates.
If the relocate node is used as below, the windows_location is transformed from a Windows path, to a UNIX path if the value of the node with ID WSLsel is true.
For example, C:\files\sample.dat is transformed into /mnt/c/files/sample.dat.
<checkbox id="WSLsel" value="true" selectonwindows="true">run in WSL?</checkbox>
<relocate id="wsl_location" wsl="${WSLsel}" from="${windows_location}"/>
Apart from the WSL use-case, the reloacte node can also be used manually, e.g. to change pathes on a remote server.
<relocate from="" to=""/>
<IF>/<ELSE> node
Using if nodes, condition specific evaluation of nodes can be performed.
For instance, depending on the state of a checkbox, either one or the other file can be taken as input.
An if node accepts three comp*arison modes: ``is_set``, ``equals`` or ``EQUALS``.
The first mode evaluates true, if the node reference in attribute *value1 evaluates to any value which is not empty.
The other two modes compare the node referance output of value1 and value2 and evaluate the if part if value1 and value2 are equal (equals, case sensitive) or are non-case-sensitive equal (EQUALS).
If the comparison does not return, the else part
<if value1="id_elem1" comp="is_set">
<value from="inputfile_1"/>
<else>
<value from="inputfile_2"/>
</else>
</if>
<VALUE> node
The value node collects the value from the node with the id given in the from attribute. If no such node exists, the value is interpreted as text. However, the const node may be more suitable here.
<value from="inputfile_1"/>
<ORDEREDADD> node
See <GROUP> node .
<ENV> node
The env (environment) node returns several system properties, such as IP addresses, the current OS, etc. .
If asked for a specific OS, the node may return true or false.
The DATADIR returns the path to where applications are stored, such as applications installed via WSL.
<env id="envip" get="IP"/>
<env id="..." get="IP|IPv4|IPv6|LINUX|UNIX|MAC|WIN|DATADIR"/>
<SCRIPT> node
For highest flexibility, <script> nodes can refer to or contain LUA code. For instance
<const id="node1">some_file.tex</const>
<script argv="${node1},pdf">
<![CDATA[
function evaluate(arg1, arg2)
return(string.sub(arg1, 0, -3) .. arg2)
end
]]>
</script>
would first split all supplied arguments from the script argv attribute and resolve those, which refer to another node (indicated by ${nodeid}).
In this case, the node with id node1 is a constant value of somefile.tex. The second argument is also constant text (_pdf_).
Therefore the inline script would be called as evaluate(some_file.tex, pdf).
The return value is thus somefile.pdf.
<EXECUTE>/<ACTION> node
<image id="statimg" src="" width="100" height="100"/>
...
<action id="with_program" program="python-prog"/>
<action id="no_program"/>
</window>
<execution>
<execute program="python-prog" exec="python" param="some.py" wsl="${WSLsel}">
<output type="COUT" color="green" to="outputstream1"/>
<output type="CERR" color="red" to="outputstream1"/>
<update deferred="true" target="statimg" attrib="src" value="..."/>
<messagebox deferred="false">This is shown before program starts.</messagebox>
<messagebox deferred="true">This is shown when program ended.</messagebox>
</execute>
<execute exec="cowsay" param="hello" wsl="${WSLsel}">
<output type="COUT" color="green" to="outputstream1"/>
<output type="CERR" color="red" to="outputstream2"/>
</execute>
</execution>
Execution and action node form a unit: the action button uses the exeuction network to execute a program. For instance, the action node with id with_program has the program attribute set. Thus, only executable nodes with a program attribute set to this value will be executed. Here, only the python program will be executed.
In contrast, the action node with id no_program has no program attribute set. Therefore, all available executable nodes will be executed. Thus, both the python program and the cowsay program will be executed.
Executable nodes may have several children. In general, these children may have a deferred attribute which means that these nodes are either activated before (deferred="false") the executable is started, or after (deferred="true").
The WSL attribute signals bioGUI whether a program should be executed in WSL/Bash on Ubuntu on Windows, or not. If this is set to true, the application is executed in WSL on Windows.
<OUTPUT> node
Output nodes transfer information while a program is running.
If they are of type STD, they transfer both standard console output (COUT) as well as standard console error (CERR).
The output is transported to the specified stream (<STREAMBOX>/<STREAM> node) in the given color.
There also exist output nodes of type TCP. These must have host (from where is information received) and port attributes set.
Additionally nodes of type FILE directly save output to a file.
<UPDATE> node
Using update nodes, attributes of visual elements can be updated. This could, for instance, be the location of an image to be displayed (as in the example above).
<MESSAGEBOX> node
Using messagebox nodes, message boxes can be created. The text of a message box may also contain node ids (given in brackets ${id}).
bioGUI Install Modules Example
Example: hisat2
Dependency/Install Part
This is already covered in section Install modules.
Template Part
The template description and title is shown in the left, template selection window of bioGUI.
The title attribute of the window tag is shown as application window title.
<template description="hisat2 2.0.5 aligner" title="hisat2 2.0.5">
<window title="hisat2 2.0.5 aligner">
All following elements are placed in a vertical layout (therefore from top to bottom). The following group collects the hisat2 index as well as the output file via a file dialog window. Remember to specify whether a file to be selected is input our output, a directory or whether multiple files can be selected (and how they are delimited).
If you know your application can run in WSL/Bash on Ubuntu on Windows, include a checkbox with the selectonwindows="true" attribute.
<vgroup>
<group title="Alignment Information">
<checkbox id="WSLsel" value="true" selectonwindows="true">run in WSL?</checkbox>
<label>hisat2 Index</label> <filedialog id="hisat_index" output="false" folder="false">Select hisat2 index</filedialog>
<label>output file</label> <filedialog id="hisat_output" output="true" folder="false">Select output file</filedialog>
</group>
Further input is collected. Not here, that you can either activate paried end or single end read data. The exclusive="true" signals bioGUI to only allow one group child to be checked.
<group title="Input Data" exclusive="true">
<hgroup>
<group id="pairedend" selected="false" title="Paired End" checkable="true">
<filedialog id="hisat_paired_m1" location="1" multiple="true">Mate 1 files</filedialog>
<filedialog id="hisat_paired_m2" location="2" multiple="true">Mate 2 files</filedialog>
</group>
<group id="singleend" selected="true" title="Unpaired reads" checkable="true">
<filedialog id="hisat_unpaired_reads" location="">Input File 1</filedialog>
</group>
</hgroup>
</group>
The following group contains several input options where a checkbox is sufficient. For more program control the phred-/report-checkboxes could also be placed inside an exclusive group.
<group title="Input Options">
<checkbox id="hisat_input_f">Reads are FASTA files</checkbox>
<checkbox id="hisat_input_r">Reads are files with one input sequence per line</checkbox>
<checkbox id="hisat_input_trim5">Trim bases from 5p</checkbox><input id="hisat_input_trim5_bases" type="int"></input>
<checkbox id="hisat_input_trim3">Trim bases from 3p</checkbox><input id="hisat_input_trim3_bases" type="int"></input>
<checkbox id="hisat_input_phred33">Qualities are phred+33</checkbox>
<checkbox id="hisat_input_phred64">Qualities are phred+64</checkbox>
<checkbox id="hisat_input_max_reports">Search at most x distinct, primary alignments for each read</checkbox><input id="hisat_input_max_reports_num" type="int"></input>
</group>
<group title="Alignment Options">
<checkbox id="hisat_align_nofw">Do not attempt to align unpaired reads to the forward reference strand</checkbox>
<checkbox id="hisat_align_norc">Do not attempt to align unpaired reads to the reverse reference strand</checkbox>
<checkbox id="hisat_align_no-softclip">Disable soft-clipping</checkbox>
<checkbox id="hisat_align_no-spliced">Disable spliced alignment</checkbox>
<checkbox id="hisat_align_no-mixed">Disable mixed alignments (if no conc/disc)</checkbox>
<checkbox id="hisat_align_no-discordant">Do not look for discordant alignments if no concordant are available</checkbox>
<combobox id="hisat_align_mate_orientations">
<comboitem value="--fr">forward/reverse</comboitem>
<comboitem value="--rf">reverse/forward</comboitem>
<comboitem value="--ff">forward/forward</comboitem>
</combobox>
</group>
<group title="Output Options">
<checkbox id="hisat_align_no-unaligned">Disable output of unaligned reads</checkbox>
<checkbox id="hisat_align_reorder">Guarantees output to be in order of input</checkbox>
<checkbox id="hisat_transcriptome_assembly_stringtie">Report alignments tailored for transcript assemblers including StringTie</checkbox>
<checkbox id="hisat_transcriptome_assembly_cufflinks">Report alignments tailored specifically for Cufflinks</checkbox>
</group>
<group title="Performance Options">
<label>Number of threads</label><input id="hisat_perf_threads" type="int">1</input>
<checkbox id="hisat_perf_reorder">Maintain order of reads</checkbox>
</group>
HISAT allows many option. Sometimes not all are documented or some are used so seldom, that it is not worth to include them as visual checkboxes.
A simple input element can serve as container for user-defined command line arguments.
Note that this action button has the program attribute set!
<group title="Advanced">
<label>Additional command-line flags</label><input id="hisat_adv_specific_options"></input>
</group>
<action program="hisat2">Align!</action>
A very important preprocessing step for HISAT is to build the index. Here (the minimal) needed input for building the index is collected.
Also the action button will only launch the program to build an index.
<group title="build index">
<label>Input Reference</label> <filedialog id="hisat_build_inref" output="false" folder="false">Select hisat2 index</filedialog>
<label>hisat2 Index</label> <filedialog id="hisat_build_idx_out" output="true" folder="false">Select hisat2 index</filedialog>
<action program="hisat2index">Build Index</action>
</group>
Finally we need a streambox to collect any (command line) output.
<streambox id="output1">
<stream id="outputstream1">std out</stream>
<stream id="outputstream2">err out</stream>
</streambox>
</vgroup>
</window>
As the visual part has been closed, we need to start the execution part.
First a const-node containing the location of the binary is created. This is filled from the install template (note the unescaped $).
Then nodes needed for launching the hisat2index program are defined.
Since this program is WSL-enabled, any folder/file must be relocated from the windows path to the WSL path.
This is done using relocate nodes.
Then the command line arguments are assembled using the add node. With the sep attribute, the delimiter can be set.
Finally the program is executed and output is redirected to the outputstream nodes.
<execution>
<const id="bindir">${PROGDIR}/${PROG}/</const>
<relocate id="hisat_build_inref_rel" from="\${hisat_build_inref}" wsl="\${WSLsel}"/>
<relocate id="hisat_build_idx_out_rel" from="\${hisat_build_idx_out}" wsl="\${WSLsel}"/>
<add id="cl_idx" sep=" ">
<value from="hisat_build_inref_rel"/>
<value from="hisat_build_idx_out_rel"/>
</add>
<execute program="hisat2index" param="\${cl_idx}" location="\${bindir}" exec="hisat2-build" wsl="WSLsel">
<output type="COUT" color="green" to="outputstream1" />
<output type="CERR" color="red" to="outputstream2" />
</execute>
The actual HISAT exeuction more input files are needed, thus more relocations are needed. Note that we also use a LUA script here to crop the file extensions from the HISAT index. For a detailled description of the script node, see <SCRIPT> node.
<relocate id="hisat_paired_m1_rel" wsl="\${WSLsel}" from="\${hisat_paired_m1}"/>
<relocate id="hisat_paired_m2_rel" wsl="\${WSLsel}" from="\${hisat_paired_m2}"/>
<relocate id="hisat_unpaired_reads_rel" wsl="\${WSLsel}" from="\${hisat_unpaired_reads}"/>
<relocate id="hisat_output_rel" wsl="\${WSLsel}" from="\${hisat_output}"/>
<relocate id="hisat_index_rel_raw" from="\${hisat_index}" wsl="\${WSLsel}"/>
<script id="hisat_index_rel" argv="\${hisat_index_rel_raw}">
<![CDATA[
function evaluate(arg1)
if (string.match(arg1, ".%d.ht2$")) then
return(string.sub(arg1, 0, arg1:find(".%d.ht2$")-1))
end
return(arg1)
end
]]>
</script>
Depending on whether pairedend or singleend data is being used, the input file arguments are assembled:
<if id="input_files" sep=" " comp="EQUALS" value1="pairedend" value2="true">
<const>-1</const>
<value from="hisat_paired_m1_rel"/>
<const>-2</const>
<value from="hisat_paired_m2_rel"/>
<else>
<const>-U</const>
<value from="hisat_unpaired_reads_rel"/>
</else>
</if>
Then all command line arguments are combined in the cl add node.
Here checkboxes are masked using if nodes. However, setting the attribute unchecked_value="" in the checkbox would have the same effect.
Finally the execute node with the program attribute for HISAT is placed.
It is important to remember that only when the action button is pressed, this node is activated.
Only then the cl node is evaluated and all the referenced input nodes are collected and evaluated!
<add id="cl" sep=" ">
<value from="hisat_adv_specific_options"/>
<const>-x</const>
<value from="hisat_index_rel"/>
<value from="input_files"/>
<const>-S</const>
<value from="hisat_output_rel"/>
<if comp="IS_SET" value1="hisat_input_f" >-f</if>
<if comp="IS_SET" value1="hisat_input_r" >-r</if>
<if comp="IS_SET" value1="hisat_input_trim5" ><value from="hisat_input_trim5_bases"/></if>
<if comp="IS_SET" value1="hisat_input_trim3" ><value from="hisat_input_trim3_bases"/></if>
<if comp="IS_SET" value1="hisat_input_phred33" >--phred33</if>
<if comp="IS_SET" value1="hisat_input_phred64" >--phred64</if>
<if comp="IS_SET" value1="hisat_align_nofw" >--nofw</if>
<if comp="IS_SET" value1="hisat_align_norc" >--norc</if>
<if comp="IS_SET" value1="hisat_transcriptome_assembly_stringtie">--downstream-transcriptome-assembly</if>
<if comp="IS_SET" value1="hisat_transcriptome_assembly_cufflinks" >--dta-cufflinks</if>
<if comp="IS_SET" value1="hisat_input_max_reports" ><value from="hisat_input_max_reports_num"/></if>
<if comp="IS_SET" value1="hisat_align_no-softclip" >--no-softclip</if>
<if comp="IS_SET" value1="hisat_align_no-spliced" >--no-spliced</if>
<if comp="IS_SET" value1="hisat_align_no-mixed" >--no-mixed</if>
<if comp="IS_SET" value1="hisat_align_no-discordant" >--no-discordant</if>
<value from="hisat_align_mate_orientations"/>
</add>
<execute program="hisat2" param="\${cl}" location="\${bindir}" exec="hisat2" wsl="WSLsel">
<output type="COUT" color="green" to="outputstream1" />
<output type="CERR" color="red" to="outputstream2" />
</execute>
</execution>
</template>
Example: Trimmomatic
Dependency/Install Part
For the install module, we start with the shebang which gives the module its name:
#! Install Trimmomatic 0.36
The text after the shebang is shown as title in the Install Trimmomatic 0.36. For the install part we remember that this is essentially a bash script. Thus any bash commands will work here.
We first have to ensure that all dependencies are installed. Trimmomatic has only java as dependency. We can install java (openJDK) on Ubuntu and in WSL, however, will ask the user to install JAVA on Mac OS:
if [ ! "$2" = "" ]; then
if [ "$(uname)" == "Darwin" ]; then
echo "PLEASE INSTALL JAVA PRIOR USING TRIMMOMATIC!"
else
echo "Installing dependencies: openjdk 9"
echo $2 | sudo -S apt-get update
echo $2 | sudo -S apt-get -y install openjdk-9-jre
fi
else
echo "No sudo password, not installing dependencies"
fi
Following the dependencies we should set multiple variables. It has shown useful to have the program name in a variable (once for processing, and once for displaying to the user):
## set all variables
PROG=trimmomatic_0_36
PROGNICE=Trimmomatic-0.36
Apart from the program name we also fetch the install dir as the first parameter given to the install module:
PROGDIR=$1
if [ -z "${PROGDIR}" ]; then
PROGDIR=~/bioGUI/progs/
fi
PROGDIRESC=$(echo $PROGDIR | sed 's/ /\\ /g')
APPBINARYDIR=${PROGDIRESC}/${PROG}/
If the PROGDIR (install dir) has not been given (is empty), we set it to a default value. We create an escaped version of the install dir (PROGDIRESC) and save the program directory where we expect the program to reside (APPBINARYDIR). In the following we create the progam’s install directory, download the application and move everything into place:
## create progdir
mkdir -p "$PROGDIR"
#download and unzip
echo "Downloading Trimmomatic"
wget http://www.usadellab.org/cms/uploads/supplementary/Trimmomatic/$PROGNICE.zip -O "$PROGDIR/$PROG.zip"
unzip -o "$PROGDIR/$PROG.zip" -d "$PROGDIR/$PROG"
mv "$PROGDIR/$PROG/"*/* "$PROGDIR/$PROG"
The user can select to add the program to the system’s PATH variable. If this should be done, the third parameter supplied to the install module is a 1. We add the escaped path to the PATH variable:
if [ $# -gt 2 ]; then
if [ "$3" = "1" ]; then
if ! grep -q "$PROGDIR/$PROG" ~/.bashrc; then
echo "export PATH=\"$PROGDIRESC/$PROG:\$PATH\" " >> ~/.bashrc;
fi
fi
fi
We are almost done. We now want to verify whether the installation has been successful. We determine this by checking whether the install directory is not empty and whether the executable is available at the thought place. If this is not the case we return the content of all affected paths for better debugging possibilities. Additionally we give the user an ERROR message with possible actions.
APPBINARYESC="${PROGDIRESC}/${PROG}/"
APPBINARY="${PROGDIRESC}/${PROG}/trimmomatic-0.36.jar"
if [ -z "$(ls -A ${APPBINARYESC})" ] || [ ! -f ${APPBINARY} ]; then
(>&2 echo ${APPBINARYESC})
(>&2 ls ${APPBINARYESC})
(>&2 echo " \n \n \n")
(>&2 echo ${PROGDIRESC})
(>&2 ls ${PROGDIRESC})
(>&2 echo " \n \n \n")
(>&2 echo ${APPBINARY})
(>&2 ls ${APPBINARY})
(>&2 echo " \n \n \n")
(>&2 echo "ERROR: The application directory is empty after installation.")
(>&2 echo "ERROR: If you experience problems please re-install the software and create an issue on https://github.com/mjoppich/bioGUI.")
(>&2 echo "ERROR: For creating the issue, please upload the log.txt file of your installation attempt.")
(>&2 echo " \n \n \n")
else
echo "${PROG} has been installed into ${APPBINARYESC}"
echo "Binary location ${APPBINARY}"
fi
Now we need to transfer the template to bioGUI. This is done via a TCP connection (because std-out and std-err are already used by the install module). The user’s IP address is given as fourth parameter to the install module, the corresponding port as the fifth parameter. Unfortunately netcat behaves differently on virtually every operating system, we must call netcat differently on Mac OS and Ubuntu, to ensure that the connection is closed upon sending the EOF.
IP=$4
PORT=$5
NCCMD=""
if [ "$(uname)" == "Darwin" ]; then
NCCMD="nc -c $IP $PORT"
else
NCCMD="nc -q 0 $IP $PORT"
fi
Finally the template is sent via netcat and the bash EOF feature:
$NCCMD <<EOF
<template ...>
...
</template>
EOF
The following section explains the template
Template Part
The template description and title is shown in the left, template selection window of bioGUI.
The title attribute of the window tag is shown as application window title.
We must remember that this template is sent via netcat and the EOF feature of bash. Thus any bash variable (indicated by a leading dollar sign) are replaced. If we need a bioGUI variable in the template (e.g. in the execution network), the dollar sign must be escaped!
<template description="Trimming short RNA-Seq Reads" title="$PROGNICE">
<window title="$PROGNICE">
All following elements are placed in a vertical layout (therefore from top to bottom). The following group collects the input files. If the user selected single-end mode, only one input and output file is needed. For paired-end sequencing data, 2 input files and 4 output files are needed.
If your application should be run in WSL/Bash on Ubuntu on Windows, include a checkbox with the selectonwindows="true" attribute.
The exclusive="true" signals bioGUI to only allow one group child to be checked.
<checkbox id="WSLsel" value="true" selectonwindows="true">Run in WSL?</checkbox>
<group title="Method" exclusive="true">
<hgroup>
<group id="pairedend" selected="false" title="Paired End" checkable="true">
<filedialog id="paired_if1" location="1">Input File 1</filedialog>
<filedialog id="paired_if2" location="2">Input File 2</filedialog>
<group title="Options">
<checkbox>Validate Pairs</checkbox>
</group>
<filedialog id="paired_of1p" location="" output="true">Output 1P</filedialog>
<filedialog id="paired_of1u" location="" output="true">Output 1U</filedialog>
<filedialog id="paired_of2p" location="" output="true">Output 2P</filedialog>
<filedialog id="paired_of2u" location="" output="true">Output 2U</filedialog>
</group>
<group id="singleend" selected="true" title="Single End" checkable="true">
<filedialog id="single_if1" location="">Input File 1</filedialog>
<filedialog id="single_of1" location="" output="true">Output</filedialog>
</group>
</hgroup>
</group>
Further options are now collected. Trimmomatic is a special case, because the order of the parameters can alter the result. We thus need an ordered group (ordered=true). The order can then later, in the execution network, be retrieved. For a better visual appearance, elements are arranged in a 3x3 grid.
<group ordered="true" id="orderedgroup" title="Step options">
<grid rows="3" cols="3">
<group id="adapters_sel" title="Adapters" checkable="true">
<filelist id="illuminaclip_auto_file" allowempty="true" path="${APPBINARYDIR}/adapters/" ext="*.fa"/>
<filedialog id="illuminaclip_man_file" location="">Adapter Sequence</filedialog>
<label>Seed Mismatches</label>
<input type="int" id="illuminaclip_seed">2</input>
<label>Palindrome Clip Threshold</label>
<input type="int" id="illuminaclip_palin">30</input>
<label>Simple Clip Threshold</label>
<input type="int" id="illuminaclip_simple">10</input>
</group>
<group id="slidingwindow_opt" selected="false" title="Sliding Window" checkable="true">
<label>Size</label>
<input id="slidingwindow_size" type="int"/>
<label>Quality</label>
<input id="slidingwindow_quality" type="int"/>
</group>
<group id="leadingwindow_opt" selected="false" title="Leading Window" checkable="true">
<hgroup>
<label>Quality</label>
<input id="leadingwindow_quality" type="int"/>
</hgroup>
</group>
<group id="trailingwindow_opt" selected="false" title="Trailing Window" checkable="true">
<hgroup>
<label>Quality</label>
<input id="trailingwindow_quality" type="int"/>
</hgroup>
</group>
<group id="crop_opt" selected="false" title="Crop" checkable="true">
<hgroup>
<label>Length</label>
<input id="crop_length" type="int"/>
</hgroup>
</group>
<group id="headcrop_opt" selected="false" title="Headcrop" checkable="true">
<hgroup>
<label>Length</label>
<input id="headcrop_length" type="int"/>
</hgroup>
</group>
<group id="minlen_opt" selected="false" title="Min Len" checkable="true">
<hgroup>
<label>Length</label>
<input id="minlen_length" type="int"/>
</hgroup>
</group>
<group title="PHRED base">
<combobox id="phred" selected="phred64">
<comboitem>phred33</comboitem>
<comboitem>phred64</comboitem>
</combobox>
</group>
</grid>
</group>
<group title="Options">
<checkbox>Quiet Mode</checkbox>
</group>
<group title="System Settings">
<label title="example 2">Threads</label>
<input id="threads_opt" hint="Amount of Threads">2</input>
</group>
The remaining part of the GUI template are output options. The streambox captures stdout and stderr output from the launched processes and shows this to the user. The action element is a button which starts the execution of the execution network (or a specific program if specified).
<streambox id="output1">
<stream id="outputstream1">OS1</stream>
<stream id="outputstream2">OS2</stream>
</streambox>
<action id="runprog" hint="click here to run program">run program</action>
</window>
We have now finished the visual part (closed window element) and need to start the execution part. This part Unfortunately is relatively bulky, because of the many input/output files.
<execution>
<if id="illuminaclip_file_tmp" value1="illuminaclip_auto_file" comp="is_set">
<value from="illuminaclip_man_file"/>
<else>
<value from="illuminaclip_man_file"/>
</else>
</if>
<if id="illuminaclip_file" comp="EQUALS" value1="WSLsel" value2="true">
<relocate from="\${illuminaclip_file_tmp}" wsl="true"/>
<else>
<value from="illuminaclip_file_tmp"/>
</else>
</if>
<relocate id="paired_if1_rel" from="\${paired_if1}" sep=" " wsl="\${WSLsel}"/>
<relocate id="paired_if2_rel" from="\${paired_if2}" sep=" " wsl="\${WSLsel}"/>
<relocate id="paired_of1p_rel" from="\${paired_of1p}" sep=" " wsl="\${WSLsel}"/>
<relocate id="paired_of1u_rel" from="\${paired_of1u}" sep=" " wsl="\${WSLsel}"/>
<relocate id="paired_of2p_rel" from="\${paired_of2p}" sep=" " wsl="\${WSLsel}"/>
<relocate id="paired_of2u_rel" from="\${paired_of2u}" sep=" " wsl="\${WSLsel}"/>
<relocate id="single_if1_rel" from="\${single_if1}" sep=" " wsl="\${WSLsel}"/>
<relocate id="single_of1_rel" from="\${single_of1}" sep=" " wsl="\${WSLsel}"/>
The relocate nodes are only used within WSL, when the Windows file path must be translated into the Unix one. For all other Operating Systems the input path is maintained and no changes are made.
<add sep=":" id="illuminaclip">
<const>ILLUMINACLIP</const>
<value from="illuminaclip_file"/>
<value from="illuminaclip_seed"/>
<value from="illuminaclip_palin"/>
<value from="illuminaclip_simple"/>
</add>
<add sep=":" id="slidingwindow">
<const>SLIDINGWINDOW</const>
<value from="slidingwindow_size"/>
<value from="slidingwindow_quality"/>
</add>
<add sep=":" id="leading">
<const>LEADING</const>
<value from="leadingwindow_quality"/>
</add>
<add sep=":" id="trailing">
<const>TRAILING</const>
<value from="trailingwindow_quality"/>
</add>
<add sep=":" id="crop">
<const>CROP</const>
<value from="crop_length"/>
</add>
<add sep=":" id="headcrop">
<const>HEADCROP</const>
<value from="headcrop_length"/>
</add>
<add sep=":" id="minlen">
<const>MINLEN</const>
<value from="minlen_length"/>
</add>
Using the above add-nodes all options are assembled. For each possible option, one add-node fetches the user supplied parameters.
Using the orderedadd-node we can assemble these parameters in the order specified by the User in the GUI. Using the selected attribute, only selected options are added together. Note that the for-attribute in the value nodes is the ID within the ordered group of the GUI template.
<orderedadd id="steps" from="orderedgroup" selected="true">
<value from="illuminaclip" for="adapters_sel"/>
<value from="slidingwindow" for="slidingwindow_opt"/>
<value from="leading" for="leadingwindow_opt"/>
<value from="trailing" for="trailingwindow_opt"/>
<value from="crop" for="crop_opt"/>
<value from="headcrop" for="headcrop_opt"/>
<value from="minlen" for="minlen_opt"/>
</orderedadd>
Finally the input files are added together, as well as the remaining general settings.
<add sep=" " id="files_pe">
<const>PE</const>
<value from="paired_if1_rel"/>
<value from="paired_if2_rel"/>
<value from="paired_of1p_rel"/>
<value from="paired_of1u_rel"/>
<value from="paired_of2p_rel"/>
<value from="paired_of2u_rel"/>
</add>
<add sep=" " id="files_se">
<const>SE</const>
<value from="single_if1_rel"/>
<value from="single_of1_rel"/>
</add>
<if id="files" value1="pairedend" comp="EQUALS" value2="true">
<value from="files_pe"/>
<else>
<value from="files_se"/>
</else>
</if>
<if id="threads" value1="threads_opt" comp="is_set">
<value from="threads_opt"/>
<else>
<const>1</const>
</else>
</if>
The remaining work to be done is to assemble all input arguments: files, settings and the steps to be executed. This outcome can be accessed via the add node with id cl.
<add sep=" " id="cl">
<value from="files"/>
<add sep="">
<const>-threads </const>
<value from="threads"/>
</add>
<add sep="">
<const>-</const>
<value from="phred"/>
</add>
<value from="steps"/>
</add>
Finally the execute node defines what program is executed. The location contains the path to the exec-utable, to which the param-eters are passed, which are here referenced from the node with id cl. The output nodes within the execute environment define where the STDOUT and STDERR output from the process should be displayed (which is the outputstream1/2 here, as defined in the GUI template). Developers can also add deferred nodes here, which are executed as soon as the program has terminated. This might be useful to move files, open/show files, etc.
<const id="bindir">${PROGDIR}/${PROG}/</const>
<execute location="" exec="java" param="-jar "\${bindir}/trimmomatic-0.36.jar" \${cl}" wsl="WSLsel">
<output type="COUT" color="green" to="outputstream1" />
<output type="CERR" color="red" to="outputstream2" />
</execute>
</execution>
</template>
Licences
bioGUI & Qt
bioGUI is licenced under GPL v3 (also due to its Qt dependancy). Thus for bioGUI and Qt the following GNU General Public License version 3 is relevant.
GNU GENERAL PUBLIC LICENSE
Version 3, 29 June 2007
Copyright (C) 2007 Free Software Foundation, Inc. <http://fsf.org/>
Everyone is permitted to copy and distribute verbatim copies
of this license document, but changing it is not allowed.
Preamble
The GNU General Public License is a free, copyleft license for
software and other kinds of works.
The licenses for most software and other practical works are designed
to take away your freedom to share and change the works. By contrast,
the GNU General Public License is intended to guarantee your freedom to
share and change all versions of a program--to make sure it remains free
software for all its users. We, the Free Software Foundation, use the
GNU General Public License for most of our software; it applies also to
any other work released this way by its authors. You can apply it to
your programs, too.
When we speak of free software, we are referring to freedom, not
price. Our General Public Licenses are designed to make sure that you
have the freedom to distribute copies of free software (and charge for
them if you wish), that you receive source code or can get it if you
want it, that you can change the software or use pieces of it in new
free programs, and that you know you can do these things.
To protect your rights, we need to prevent others from denying you
these rights or asking you to surrender the rights. Therefore, you have
certain responsibilities if you distribute copies of the software, or if
you modify it: responsibilities to respect the freedom of others.
For example, if you distribute copies of such a program, whether
gratis or for a fee, you must pass on to the recipients the same
freedoms that you received. You must make sure that they, too, receive
or can get the source code. And you must show them these terms so they
know their rights.
Developers that use the GNU GPL protect your rights with two steps:
(1) assert copyright on the software, and (2) offer you this License
giving you legal permission to copy, distribute and/or modify it.
For the developers' and authors' protection, the GPL clearly explains
that there is no warranty for this free software. For both users' and
authors' sake, the GPL requires that modified versions be marked as
changed, so that their problems will not be attributed erroneously to
authors of previous versions.
Some devices are designed to deny users access to install or run
modified versions of the software inside them, although the manufacturer
can do so. This is fundamentally incompatible with the aim of
protecting users' freedom to change the software. The systematic
pattern of such abuse occurs in the area of products for individuals to
use, which is precisely where it is most unacceptable. Therefore, we
have designed this version of the GPL to prohibit the practice for those
products. If such problems arise substantially in other domains, we
stand ready to extend this provision to those domains in future versions
of the GPL, as needed to protect the freedom of users.
Finally, every program is threatened constantly by software patents.
States should not allow patents to restrict development and use of
software on general-purpose computers, but in those that do, we wish to
avoid the special danger that patents applied to a free program could
make it effectively proprietary. To prevent this, the GPL assures that
patents cannot be used to render the program non-free.
The precise terms and conditions for copying, distribution and
modification follow.
TERMS AND CONDITIONS
0. Definitions.
"This License" refers to version 3 of the GNU General Public License.
"Copyright" also means copyright-like laws that apply to other kinds of
works, such as semiconductor masks.
"The Program" refers to any copyrightable work licensed under this
License. Each licensee is addressed as "you". "Licensees" and
"recipients" may be individuals or organizations.
To "modify" a work means to copy from or adapt all or part of the work
in a fashion requiring copyright permission, other than the making of an
exact copy. The resulting work is called a "modified version" of the
earlier work or a work "based on" the earlier work.
A "covered work" means either the unmodified Program or a work based
on the Program.
To "propagate" a work means to do anything with it that, without
permission, would make you directly or secondarily liable for
infringement under applicable copyright law, except executing it on a
computer or modifying a private copy. Propagation includes copying,
distribution (with or without modification), making available to the
public, and in some countries other activities as well.
To "convey" a work means any kind of propagation that enables other
parties to make or receive copies. Mere interaction with a user through
a computer network, with no transfer of a copy, is not conveying.
An interactive user interface displays "Appropriate Legal Notices"
to the extent that it includes a convenient and prominently visible
feature that (1) displays an appropriate copyright notice, and (2)
tells the user that there is no warranty for the work (except to the
extent that warranties are provided), that licensees may convey the
work under this License, and how to view a copy of this License. If
the interface presents a list of user commands or options, such as a
menu, a prominent item in the list meets this criterion.
1. Source Code.
The "source code" for a work means the preferred form of the work
for making modifications to it. "Object code" means any non-source
form of a work.
A "Standard Interface" means an interface that either is an official
standard defined by a recognized standards body, or, in the case of
interfaces specified for a particular programming language, one that
is widely used among developers working in that language.
The "System Libraries" of an executable work include anything, other
than the work as a whole, that (a) is included in the normal form of
packaging a Major Component, but which is not part of that Major
Component, and (b) serves only to enable use of the work with that
Major Component, or to implement a Standard Interface for which an
implementation is available to the public in source code form. A
"Major Component", in this context, means a major essential component
(kernel, window system, and so on) of the specific operating system
(if any) on which the executable work runs, or a compiler used to
produce the work, or an object code interpreter used to run it.
The "Corresponding Source" for a work in object code form means all
the source code needed to generate, install, and (for an executable
work) run the object code and to modify the work, including scripts to
control those activities. However, it does not include the work's
System Libraries, or general-purpose tools or generally available free
programs which are used unmodified in performing those activities but
which are not part of the work. For example, Corresponding Source
includes interface definition files associated with source files for
the work, and the source code for shared libraries and dynamically
linked subprograms that the work is specifically designed to require,
such as by intimate data communication or control flow between those
subprograms and other parts of the work.
The Corresponding Source need not include anything that users
can regenerate automatically from other parts of the Corresponding
Source.
The Corresponding Source for a work in source code form is that
same work.
2. Basic Permissions.
All rights granted under this License are granted for the term of
copyright on the Program, and are irrevocable provided the stated
conditions are met. This License explicitly affirms your unlimited
permission to run the unmodified Program. The output from running a
covered work is covered by this License only if the output, given its
content, constitutes a covered work. This License acknowledges your
rights of fair use or other equivalent, as provided by copyright law.
You may make, run and propagate covered works that you do not
convey, without conditions so long as your license otherwise remains
in force. You may convey covered works to others for the sole purpose
of having them make modifications exclusively for you, or provide you
with facilities for running those works, provided that you comply with
the terms of this License in conveying all material for which you do
not control copyright. Those thus making or running the covered works
for you must do so exclusively on your behalf, under your direction
and control, on terms that prohibit them from making any copies of
your copyrighted material outside their relationship with you.
Conveying under any other circumstances is permitted solely under
the conditions stated below. Sublicensing is not allowed; section 10
makes it unnecessary.
3. Protecting Users' Legal Rights From Anti-Circumvention Law.
No covered work shall be deemed part of an effective technological
measure under any applicable law fulfilling obligations under article
11 of the WIPO copyright treaty adopted on 20 December 1996, or
similar laws prohibiting or restricting circumvention of such
measures.
When you convey a covered work, you waive any legal power to forbid
circumvention of technological measures to the extent such circumvention
is effected by exercising rights under this License with respect to
the covered work, and you disclaim any intention to limit operation or
modification of the work as a means of enforcing, against the work's
users, your or third parties' legal rights to forbid circumvention of
technological measures.
4. Conveying Verbatim Copies.
You may convey verbatim copies of the Program's source code as you
receive it, in any medium, provided that you conspicuously and
appropriately publish on each copy an appropriate copyright notice;
keep intact all notices stating that this License and any
non-permissive terms added in accord with section 7 apply to the code;
keep intact all notices of the absence of any warranty; and give all
recipients a copy of this License along with the Program.
You may charge any price or no price for each copy that you convey,
and you may offer support or warranty protection for a fee.
5. Conveying Modified Source Versions.
You may convey a work based on the Program, or the modifications to
produce it from the Program, in the form of source code under the
terms of section 4, provided that you also meet all of these conditions:
a) The work must carry prominent notices stating that you modified
it, and giving a relevant date.
b) The work must carry prominent notices stating that it is
released under this License and any conditions added under section
7. This requirement modifies the requirement in section 4 to
"keep intact all notices".
c) You must license the entire work, as a whole, under this
License to anyone who comes into possession of a copy. This
License will therefore apply, along with any applicable section 7
additional terms, to the whole of the work, and all its parts,
regardless of how they are packaged. This License gives no
permission to license the work in any other way, but it does not
invalidate such permission if you have separately received it.
d) If the work has interactive user interfaces, each must display
Appropriate Legal Notices; however, if the Program has interactive
interfaces that do not display Appropriate Legal Notices, your
work need not make them do so.
A compilation of a covered work with other separate and independent
works, which are not by their nature extensions of the covered work,
and which are not combined with it such as to form a larger program,
in or on a volume of a storage or distribution medium, is called an
"aggregate" if the compilation and its resulting copyright are not
used to limit the access or legal rights of the compilation's users
beyond what the individual works permit. Inclusion of a covered work
in an aggregate does not cause this License to apply to the other
parts of the aggregate.
6. Conveying Non-Source Forms.
You may convey a covered work in object code form under the terms
of sections 4 and 5, provided that you also convey the
machine-readable Corresponding Source under the terms of this License,
in one of these ways:
a) Convey the object code in, or embodied in, a physical product
(including a physical distribution medium), accompanied by the
Corresponding Source fixed on a durable physical medium
customarily used for software interchange.
b) Convey the object code in, or embodied in, a physical product
(including a physical distribution medium), accompanied by a
written offer, valid for at least three years and valid for as
long as you offer spare parts or customer support for that product
model, to give anyone who possesses the object code either (1) a
copy of the Corresponding Source for all the software in the
product that is covered by this License, on a durable physical
medium customarily used for software interchange, for a price no
more than your reasonable cost of physically performing this
conveying of source, or (2) access to copy the
Corresponding Source from a network server at no charge.
c) Convey individual copies of the object code with a copy of the
written offer to provide the Corresponding Source. This
alternative is allowed only occasionally and noncommercially, and
only if you received the object code with such an offer, in accord
with subsection 6b.
d) Convey the object code by offering access from a designated
place (gratis or for a charge), and offer equivalent access to the
Corresponding Source in the same way through the same place at no
further charge. You need not require recipients to copy the
Corresponding Source along with the object code. If the place to
copy the object code is a network server, the Corresponding Source
may be on a different server (operated by you or a third party)
that supports equivalent copying facilities, provided you maintain
clear directions next to the object code saying where to find the
Corresponding Source. Regardless of what server hosts the
Corresponding Source, you remain obligated to ensure that it is
available for as long as needed to satisfy these requirements.
e) Convey the object code using peer-to-peer transmission, provided
you inform other peers where the object code and Corresponding
Source of the work are being offered to the general public at no
charge under subsection 6d.
A separable portion of the object code, whose source code is excluded
from the Corresponding Source as a System Library, need not be
included in conveying the object code work.
A "User Product" is either (1) a "consumer product", which means any
tangible personal property which is normally used for personal, family,
or household purposes, or (2) anything designed or sold for incorporation
into a dwelling. In determining whether a product is a consumer product,
doubtful cases shall be resolved in favor of coverage. For a particular
product received by a particular user, "normally used" refers to a
typical or common use of that class of product, regardless of the status
of the particular user or of the way in which the particular user
actually uses, or expects or is expected to use, the product. A product
is a consumer product regardless of whether the product has substantial
commercial, industrial or non-consumer uses, unless such uses represent
the only significant mode of use of the product.
"Installation Information" for a User Product means any methods,
procedures, authorization keys, or other information required to install
and execute modified versions of a covered work in that User Product from
a modified version of its Corresponding Source. The information must
suffice to ensure that the continued functioning of the modified object
code is in no case prevented or interfered with solely because
modification has been made.
If you convey an object code work under this section in, or with, or
specifically for use in, a User Product, and the conveying occurs as
part of a transaction in which the right of possession and use of the
User Product is transferred to the recipient in perpetuity or for a
fixed term (regardless of how the transaction is characterized), the
Corresponding Source conveyed under this section must be accompanied
by the Installation Information. But this requirement does not apply
if neither you nor any third party retains the ability to install
modified object code on the User Product (for example, the work has
been installed in ROM).
The requirement to provide Installation Information does not include a
requirement to continue to provide support service, warranty, or updates
for a work that has been modified or installed by the recipient, or for
the User Product in which it has been modified or installed. Access to a
network may be denied when the modification itself materially and
adversely affects the operation of the network or violates the rules and
protocols for communication across the network.
Corresponding Source conveyed, and Installation Information provided,
in accord with this section must be in a format that is publicly
documented (and with an implementation available to the public in
source code form), and must require no special password or key for
unpacking, reading or copying.
7. Additional Terms.
"Additional permissions" are terms that supplement the terms of this
License by making exceptions from one or more of its conditions.
Additional permissions that are applicable to the entire Program shall
be treated as though they were included in this License, to the extent
that they are valid under applicable law. If additional permissions
apply only to part of the Program, that part may be used separately
under those permissions, but the entire Program remains governed by
this License without regard to the additional permissions.
When you convey a copy of a covered work, you may at your option
remove any additional permissions from that copy, or from any part of
it. (Additional permissions may be written to require their own
removal in certain cases when you modify the work.) You may place
additional permissions on material, added by you to a covered work,
for which you have or can give appropriate copyright permission.
Notwithstanding any other provision of this License, for material you
add to a covered work, you may (if authorized by the copyright holders of
that material) supplement the terms of this License with terms:
a) Disclaiming warranty or limiting liability differently from the
terms of sections 15 and 16 of this License; or
b) Requiring preservation of specified reasonable legal notices or
author attributions in that material or in the Appropriate Legal
Notices displayed by works containing it; or
c) Prohibiting misrepresentation of the origin of that material, or
requiring that modified versions of such material be marked in
reasonable ways as different from the original version; or
d) Limiting the use for publicity purposes of names of licensors or
authors of the material; or
e) Declining to grant rights under trademark law for use of some
trade names, trademarks, or service marks; or
f) Requiring indemnification of licensors and authors of that
material by anyone who conveys the material (or modified versions of
it) with contractual assumptions of liability to the recipient, for
any liability that these contractual assumptions directly impose on
those licensors and authors.
All other non-permissive additional terms are considered "further
restrictions" within the meaning of section 10. If the Program as you
received it, or any part of it, contains a notice stating that it is
governed by this License along with a term that is a further
restriction, you may remove that term. If a license document contains
a further restriction but permits relicensing or conveying under this
License, you may add to a covered work material governed by the terms
of that license document, provided that the further restriction does
not survive such relicensing or conveying.
If you add terms to a covered work in accord with this section, you
must place, in the relevant source files, a statement of the
additional terms that apply to those files, or a notice indicating
where to find the applicable terms.
Additional terms, permissive or non-permissive, may be stated in the
form of a separately written license, or stated as exceptions;
the above requirements apply either way.
8. Termination.
You may not propagate or modify a covered work except as expressly
provided under this License. Any attempt otherwise to propagate or
modify it is void, and will automatically terminate your rights under
this License (including any patent licenses granted under the third
paragraph of section 11).
However, if you cease all violation of this License, then your
license from a particular copyright holder is reinstated (a)
provisionally, unless and until the copyright holder explicitly and
finally terminates your license, and (b) permanently, if the copyright
holder fails to notify you of the violation by some reasonable means
prior to 60 days after the cessation.
Moreover, your license from a particular copyright holder is
reinstated permanently if the copyright holder notifies you of the
violation by some reasonable means, this is the first time you have
received notice of violation of this License (for any work) from that
copyright holder, and you cure the violation prior to 30 days after
your receipt of the notice.
Termination of your rights under this section does not terminate the
licenses of parties who have received copies or rights from you under
this License. If your rights have been terminated and not permanently
reinstated, you do not qualify to receive new licenses for the same
material under section 10.
9. Acceptance Not Required for Having Copies.
You are not required to accept this License in order to receive or
run a copy of the Program. Ancillary propagation of a covered work
occurring solely as a consequence of using peer-to-peer transmission
to receive a copy likewise does not require acceptance. However,
nothing other than this License grants you permission to propagate or
modify any covered work. These actions infringe copyright if you do
not accept this License. Therefore, by modifying or propagating a
covered work, you indicate your acceptance of this License to do so.
10. Automatic Licensing of Downstream Recipients.
Each time you convey a covered work, the recipient automatically
receives a license from the original licensors, to run, modify and
propagate that work, subject to this License. You are not responsible
for enforcing compliance by third parties with this License.
An "entity transaction" is a transaction transferring control of an
organization, or substantially all assets of one, or subdividing an
organization, or merging organizations. If propagation of a covered
work results from an entity transaction, each party to that
transaction who receives a copy of the work also receives whatever
licenses to the work the party's predecessor in interest had or could
give under the previous paragraph, plus a right to possession of the
Corresponding Source of the work from the predecessor in interest, if
the predecessor has it or can get it with reasonable efforts.
You may not impose any further restrictions on the exercise of the
rights granted or affirmed under this License. For example, you may
not impose a license fee, royalty, or other charge for exercise of
rights granted under this License, and you may not initiate litigation
(including a cross-claim or counterclaim in a lawsuit) alleging that
any patent claim is infringed by making, using, selling, offering for
sale, or importing the Program or any portion of it.
11. Patents.
A "contributor" is a copyright holder who authorizes use under this
License of the Program or a work on which the Program is based. The
work thus licensed is called the contributor's "contributor version".
A contributor's "essential patent claims" are all patent claims
owned or controlled by the contributor, whether already acquired or
hereafter acquired, that would be infringed by some manner, permitted
by this License, of making, using, or selling its contributor version,
but do not include claims that would be infringed only as a
consequence of further modification of the contributor version. For
purposes of this definition, "control" includes the right to grant
patent sublicenses in a manner consistent with the requirements of
this License.
Each contributor grants you a non-exclusive, worldwide, royalty-free
patent license under the contributor's essential patent claims, to
make, use, sell, offer for sale, import and otherwise run, modify and
propagate the contents of its contributor version.
In the following three paragraphs, a "patent license" is any express
agreement or commitment, however denominated, not to enforce a patent
(such as an express permission to practice a patent or covenant not to
sue for patent infringement). To "grant" such a patent license to a
party means to make such an agreement or commitment not to enforce a
patent against the party.
If you convey a covered work, knowingly relying on a patent license,
and the Corresponding Source of the work is not available for anyone
to copy, free of charge and under the terms of this License, through a
publicly available network server or other readily accessible means,
then you must either (1) cause the Corresponding Source to be so
available, or (2) arrange to deprive yourself of the benefit of the
patent license for this particular work, or (3) arrange, in a manner
consistent with the requirements of this License, to extend the patent
license to downstream recipients. "Knowingly relying" means you have
actual knowledge that, but for the patent license, your conveying the
covered work in a country, or your recipient's use of the covered work
in a country, would infringe one or more identifiable patents in that
country that you have reason to believe are valid.
If, pursuant to or in connection with a single transaction or
arrangement, you convey, or propagate by procuring conveyance of, a
covered work, and grant a patent license to some of the parties
receiving the covered work authorizing them to use, propagate, modify
or convey a specific copy of the covered work, then the patent license
you grant is automatically extended to all recipients of the covered
work and works based on it.
A patent license is "discriminatory" if it does not include within
the scope of its coverage, prohibits the exercise of, or is
conditioned on the non-exercise of one or more of the rights that are
specifically granted under this License. You may not convey a covered
work if you are a party to an arrangement with a third party that is
in the business of distributing software, under which you make payment
to the third party based on the extent of your activity of conveying
the work, and under which the third party grants, to any of the
parties who would receive the covered work from you, a discriminatory
patent license (a) in connection with copies of the covered work
conveyed by you (or copies made from those copies), or (b) primarily
for and in connection with specific products or compilations that
contain the covered work, unless you entered into that arrangement,
or that patent license was granted, prior to 28 March 2007.
Nothing in this License shall be construed as excluding or limiting
any implied license or other defenses to infringement that may
otherwise be available to you under applicable patent law.
12. No Surrender of Others' Freedom.
If conditions are imposed on you (whether by court order, agreement or
otherwise) that contradict the conditions of this License, they do not
excuse you from the conditions of this License. If you cannot convey a
covered work so as to satisfy simultaneously your obligations under this
License and any other pertinent obligations, then as a consequence you may
not convey it at all. For example, if you agree to terms that obligate you
to collect a royalty for further conveying from those to whom you convey
the Program, the only way you could satisfy both those terms and this
License would be to refrain entirely from conveying the Program.
13. Use with the GNU Affero General Public License.
Notwithstanding any other provision of this License, you have
permission to link or combine any covered work with a work licensed
under version 3 of the GNU Affero General Public License into a single
combined work, and to convey the resulting work. The terms of this
License will continue to apply to the part which is the covered work,
but the special requirements of the GNU Affero General Public License,
section 13, concerning interaction through a network will apply to the
combination as such.
14. Revised Versions of this License.
The Free Software Foundation may publish revised and/or new versions of
the GNU General Public License from time to time. Such new versions will
be similar in spirit to the present version, but may differ in detail to
address new problems or concerns.
Each version is given a distinguishing version number. If the
Program specifies that a certain numbered version of the GNU General
Public License "or any later version" applies to it, you have the
option of following the terms and conditions either of that numbered
version or of any later version published by the Free Software
Foundation. If the Program does not specify a version number of the
GNU General Public License, you may choose any version ever published
by the Free Software Foundation.
If the Program specifies that a proxy can decide which future
versions of the GNU General Public License can be used, that proxy's
public statement of acceptance of a version permanently authorizes you
to choose that version for the Program.
Later license versions may give you additional or different
permissions. However, no additional obligations are imposed on any
author or copyright holder as a result of your choosing to follow a
later version.
15. Disclaimer of Warranty.
THERE IS NO WARRANTY FOR THE PROGRAM, TO THE EXTENT PERMITTED BY
APPLICABLE LAW. EXCEPT WHEN OTHERWISE STATED IN WRITING THE COPYRIGHT
HOLDERS AND/OR OTHER PARTIES PROVIDE THE PROGRAM "AS IS" WITHOUT WARRANTY
OF ANY KIND, EITHER EXPRESSED OR IMPLIED, INCLUDING, BUT NOT LIMITED TO,
THE IMPLIED WARRANTIES OF MERCHANTABILITY AND FITNESS FOR A PARTICULAR
PURPOSE. THE ENTIRE RISK AS TO THE QUALITY AND PERFORMANCE OF THE PROGRAM
IS WITH YOU. SHOULD THE PROGRAM PROVE DEFECTIVE, YOU ASSUME THE COST OF
ALL NECESSARY SERVICING, REPAIR OR CORRECTION.
16. Limitation of Liability.
IN NO EVENT UNLESS REQUIRED BY APPLICABLE LAW OR AGREED TO IN WRITING
WILL ANY COPYRIGHT HOLDER, OR ANY OTHER PARTY WHO MODIFIES AND/OR CONVEYS
THE PROGRAM AS PERMITTED ABOVE, BE LIABLE TO YOU FOR DAMAGES, INCLUDING ANY
GENERAL, SPECIAL, INCIDENTAL OR CONSEQUENTIAL DAMAGES ARISING OUT OF THE
USE OR INABILITY TO USE THE PROGRAM (INCLUDING BUT NOT LIMITED TO LOSS OF
DATA OR DATA BEING RENDERED INACCURATE OR LOSSES SUSTAINED BY YOU OR THIRD
PARTIES OR A FAILURE OF THE PROGRAM TO OPERATE WITH ANY OTHER PROGRAMS),
EVEN IF SUCH HOLDER OR OTHER PARTY HAS BEEN ADVISED OF THE POSSIBILITY OF
SUCH DAMAGES.
17. Interpretation of Sections 15 and 16.
If the disclaimer of warranty and limitation of liability provided
above cannot be given local legal effect according to their terms,
reviewing courts shall apply local law that most closely approximates
an absolute waiver of all civil liability in connection with the
Program, unless a warranty or assumption of liability accompanies a
copy of the Program in return for a fee.
END OF TERMS AND CONDITIONS
LUA
This project requires a static LUA library to build. For the release of this software, LuaBinaries static liblua53.a was used and requires the following copyright notice to be included:
Copyright © 2005-2016 Tecgraf/PUC-Rio and the Kepler Project.
Permission is hereby granted, free of charge, to any person obtaining a copy of this software and associated documentation files (the "Software"), to deal in the Software without restriction, including without limitation the rights to use, copy, modify, merge, publish, distribute, sublicense, and/or sell copies of the Software, and to permit persons to whom the Software is furnished to do so, subject to the following conditions:
The above copyright notice and this permission notice shall be included in all copies or substantial portions of the Software.
THE SOFTWARE IS PROVIDED "AS IS", WITHOUT WARRANTY OF ANY KIND, EXPRESS OR IMPLIED, INCLUDING BUT NOT LIMITED TO THE WARRANTIES OF MERCHANTABILITY, FITNESS FOR A PARTICULAR PURPOSE AND NONINFRINGEMENT. IN NO EVENT SHALL THE AUTHORS OR COPYRIGHT HOLDERS BE LIABLE FOR ANY CLAIM, DAMAGES OR OTHER LIABILITY, WHETHER IN AN ACTION OF CONTRACT, TORT OR OTHERWISE, ARISING FROM, OUT OF OR IN CONNECTION WITH THE SOFTWARE OR THE USE OR OTHER DEALINGS IN THE SOFTWARE.
OpenSSL
This project also requires a static OpenSSL library to build. For the release of this software, OpenSSL static libraries were used and require the following copyright notice to be included:
This product includes software developed by the OpenSSL Project for use in the OpenSSL Toolkit (http://www.openssl.org/) This product includes cryptographic software written by Eric Young (eay@cryptsoft.com). This product includes software written by Tim Hudson (tjh@cryptsoft.com).
LICENSE ISSUES
==============
The OpenSSL toolkit stays under a dual license, i.e. both the conditions of
the OpenSSL License and the original SSLeay license apply to the toolkit.
See below for the actual license texts.
OpenSSL License
---------------
====================================================================
Copyright (c) 1998-2016 The OpenSSL Project. All rights reserved.
Redistribution and use in source and binary forms, with or without
modification, are permitted provided that the following conditions
are met:
1. Redistributions of source code must retain the above copyright
notice, this list of conditions and the following disclaimer.
2. Redistributions in binary form must reproduce the above copyright
notice, this list of conditions and the following disclaimer in
the documentation and/or other materials provided with the
distribution.
3. All advertising materials mentioning features or use of this
software must display the following acknowledgment:
"This product includes software developed by the OpenSSL Project
for use in the OpenSSL Toolkit. (http://www.openssl.org/)"
4. The names "OpenSSL Toolkit" and "OpenSSL Project" must not be used to
endorse or promote products derived from this software without
prior written permission. For written permission, please contact
openssl-core@openssl.org.
5. Products derived from this software may not be called "OpenSSL"
nor may "OpenSSL" appear in their names without prior written
permission of the OpenSSL Project.
6. Redistributions of any form whatsoever must retain the following
acknowledgment:
"This product includes software developed by the OpenSSL Project
for use in the OpenSSL Toolkit (http://www.openssl.org/)"
THIS SOFTWARE IS PROVIDED BY THE OpenSSL PROJECT ``AS IS'' AND ANY
EXPRESSED OR IMPLIED WARRANTIES, INCLUDING, BUT NOT LIMITED TO, THE
IMPLIED WARRANTIES OF MERCHANTABILITY AND FITNESS FOR A PARTICULAR
PURPOSE ARE DISCLAIMED. IN NO EVENT SHALL THE OpenSSL PROJECT OR
ITS CONTRIBUTORS BE LIABLE FOR ANY DIRECT, INDIRECT, INCIDENTAL,
SPECIAL, EXEMPLARY, OR CONSEQUENTIAL DAMAGES (INCLUDING, BUT
NOT LIMITED TO, PROCUREMENT OF SUBSTITUTE GOODS OR SERVICES;
LOSS OF USE, DATA, OR PROFITS; OR BUSINESS INTERRUPTION)
HOWEVER CAUSED AND ON ANY THEORY OF LIABILITY, WHETHER IN CONTRACT,
STRICT LIABILITY, OR TORT (INCLUDING NEGLIGENCE OR OTHERWISE)
ARISING IN ANY WAY OUT OF THE USE OF THIS SOFTWARE, EVEN IF ADVISED
OF THE POSSIBILITY OF SUCH DAMAGE.
====================================================================
This product includes cryptographic software written by Eric Young
(eay@cryptsoft.com). This product includes software written by Tim
Hudson (tjh@cryptsoft.com).
Original SSLeay License
-----------------------
Copyright (C) 1995-1998 Eric Young (eay@cryptsoft.com)
All rights reserved.
This package is an SSL implementation written
by Eric Young (eay@cryptsoft.com).
The implementation was written so as to conform with Netscapes SSL.
This library is free for commercial and non-commercial use as long as
the following conditions are aheared to. The following conditions
apply to all code found in this distribution, be it the RC4, RSA,
lhash, DES, etc., code; not just the SSL code. The SSL documentation
included with this distribution is covered by the same copyright terms
except that the holder is Tim Hudson (tjh@cryptsoft.com).
Copyright remains Eric Young's, and as such any Copyright notices in
the code are not to be removed.
If this package is used in a product, Eric Young should be given attribution
as the author of the parts of the library used.
This can be in the form of a textual message at program startup or
in documentation (online or textual) provided with the package.
Redistribution and use in source and binary forms, with or without
modification, are permitted provided that the following conditions
are met:
1. Redistributions of source code must retain the copyright
notice, this list of conditions and the following disclaimer.
2. Redistributions in binary form must reproduce the above copyright
notice, this list of conditions and the following disclaimer in the
documentation and/or other materials provided with the distribution.
3. All advertising materials mentioning features or use of this software
must display the following acknowledgement:
"This product includes cryptographic software written by
Eric Young (eay@cryptsoft.com)"
The word 'cryptographic' can be left out if the rouines from the library
being used are not cryptographic related :-).
4. If you include any Windows specific code (or a derivative thereof) from
the apps directory (application code) you must include an acknowledgement:
"This product includes software written by Tim Hudson (tjh@cryptsoft.com)"
THIS SOFTWARE IS PROVIDED BY ERIC YOUNG ``AS IS'' AND
ANY EXPRESS OR IMPLIED WARRANTIES, INCLUDING, BUT NOT LIMITED TO, THE
IMPLIED WARRANTIES OF MERCHANTABILITY AND FITNESS FOR A PARTICULAR PURPOSE
ARE DISCLAIMED. IN NO EVENT SHALL THE AUTHOR OR CONTRIBUTORS BE LIABLE
FOR ANY DIRECT, INDIRECT, INCIDENTAL, SPECIAL, EXEMPLARY, OR CONSEQUENTIAL
DAMAGES (INCLUDING, BUT NOT LIMITED TO, PROCUREMENT OF SUBSTITUTE GOODS
OR SERVICES; LOSS OF USE, DATA, OR PROFITS; OR BUSINESS INTERRUPTION)
HOWEVER CAUSED AND ON ANY THEORY OF LIABILITY, WHETHER IN CONTRACT, STRICT
LIABILITY, OR TORT (INCLUDING NEGLIGENCE OR OTHERWISE) ARISING IN ANY WAY
OUT OF THE USE OF THIS SOFTWARE, EVEN IF ADVISED OF THE POSSIBILITY OF
SUCH DAMAGE.
The licence and distribution terms for any publically available version or
derivative of this code cannot be changed. i.e. this code cannot simply be
copied and put under another distribution licence
[including the GNU Public Licence.]